Universal Carrier Module (UCM) Carrier
Configuring a UCM Carrier
You configure a UCM carrier just as you would any other carrier in Parcel.
To configure the UCM carrier account number and services, complete these steps...
-
In the Account Number field, type the carrier account number for this location.
-
In Carrier Code field, type a name for the carrier as you want it to appear on the Web Admin (Configuration) Tool screens and on the shipping screens in Parcel. For example, if you are setting up more than one UCM account for this location, you might want to label these UCMCAR-1, UCMCAR-2, etc.
-
In the Services section, select the carrier services that you will use to ship packages from this location by selecting the service or services from the list of available services.
Note: The list of service names varies depending on how your UCM carrier definition is configured. The list of service names shows all the services that are defined for this carrier in UCM. -
Click ADD to move the selected service from the left-hand column to the right-hand column. To select and move all of the services at once, click ADD ALL.
You can also use the Move Up and Move Down (up arrow and down arrow) on the right to change the order of the services in the list of following services. Services appear in the configured order on the Services drop-down list on the Warehouse screen. -
When you are done configuring this page, click SAVE in the lower-right corner of the page to save the settings. Otherwise, click the CANCEL to cancel the settings.
To continue configuring UCM, see the section UCM Carrier Administration.
Configuring Time in Transit Calculation with a UCM carrier
In addition to the previously listed screens, if you enable time in transit calculation on the Shipper Defaults > Time in Transit tab, the following additional screen is available for importing time in transit data: Import Time in Transit Files. See the following Help topics:
-
Overview of Time in Transit Calculation
-
UCM Administration
Redeployment Requirements
Overview
Changes made to a UCM carrier in UCM may require the carrier to be redeployed in Parcel. However, there are a number of changes that can be made to UCM carriers which do not require redeployment. For example, changes to objects that are strictly for internal use within the UCM application itself do not require redeployment. The following sections describe which modifications to UCM require redeployment and which ones do not.
Global Elements that can be changed on all object types without requiring redeployment include the following:
-
Scripts attached to objects
-
Descriptions of objects
-
Label, EDI, and Report text
Additionally, any changes to the following objects do not require redeployment:
-
Artifacts
-
Events
-
Geographic Codes
-
Label Templates
-
Scripts
-
Tracking Number Generators
Notes:
-
To redeploy an existing UCM carrier in Parcel, open UCM, select the carrier to display the carrier screen, and then click Deploy. See the UCM Help for more information on this process.
-
Changes requiring redeployment are typically those that update the Parcel database or the XML configuration file for the UCM carrier.
Redeployment Requirements
The following changes to UCM objects require redeployment:
|
UCM Object |
Changes Requiring Redeployment |
|
Carrier |
Any changes to the carrier screen itself except for scripts specified on that screen. |
|
Service |
Adding, removing, or changing the name of a service; adding or removing billing types, charges, packaging types, or UI Transactional elements to or from a service. |
|
Billing Type |
Changes to billing types by adding, removing, or changing the name, billing account, or address value. Additionally, if a billing type is added to or removed from a service, redeployment is required. |
|
Charge |
Changes to the charge name or response key. Additionally, if a charge is added to or removed from a service, redeployment is required. |
|
Packaging Type |
Changes to packaging types by adding, removing, or changing the name. Additionally, if a packaging type is added to or removed from a service, redeployment is required. |
|
Rating Method |
Adding or deleting a rating method. |
|
Report |
Selecting a report for use or removing the report from the list of selected reports. |
|
Sequence Number |
Adding, removing, or changing the name of a sequence number.
|
|
UI Administrative Element |
All changes to UI Administrative elements. |
|
UI Transactional Element |
All changes to UI Transactional elements. |
|
Zoning Method |
Adding or removing a zoning method. |
UCM Carrier Administration
Overview
UCM Administrative Links and Screens
Depending upon how your UCM carrier was defined, there are different areas that can be configured. However, each UCM carrier instance in Parcel has the following links and screens by default:
-
Shipper Defaults
-
Sequence Data
-
Geographic Code
-
Transit Days
-
Holidays
-
Import TinT Files
-
Manage Custom Rates
-
Manage Custom Routes
-
Manage Custom Zones
-
Import Custom Data
-
Manage UI Elements
Shipper Defaults
UI Administrative elements that you create in UCM can appear as tabs on the Shipper Defaults screen. You can also create additional administrative screens. After you set upyour UCM carrier definition and add the carrier to a Parcel location, you can manage the administrative elements at the carrier instance level in Parcel by changing default values using the Parcel Web Admin tool. Defaults that you set in Parcel override those set in UCM. See the following Help topic: Shipper Defaults and Sequence Data.
Sequence Data
Sequence numbers created for a UCM carrier definition translate into a Sequence Data link and screen when in the Parcel carrier instance. The Sequence Data screen includes a tab for each sequence number created in UCM. See the following Help topic: Shipper Defaults and Sequence Data.
Geographic Code
After you import the Geographic Code file, Parcel displays the table of these values on this screen, enabling you to add, edit, or delete rows as needed. See Carrier Configuration > Geographic Codes.
Transit Days
This screen displays the transit days and related information that Parcel uses for time in transit calculations. After you import the time in transit file, Parcel displays the table of these values on this screen, enabling you to add, edit, or delete rows as needed. See Carrier Configuration > Transit Days and Holidays.
Holidays
This screen displays the Holidays that Parcel uses for time in transit calculations. After you import the Carrier Holidays file, Parcel displays the table of these values on this screen, enabling you to add, edit, or delete rows as needed. See Carrier Configuration > Transit Days and Holidays.
Import TinT Files
This screen has the following fields:
-
Geographic Data File – Use to specify the path name and filename of the geographic data file.
-
Time in Transit File – Use to specify the path name and filename of the time in transit file.
-
Holiday File – Use to specify the path name and filename of the holiday file.
These are the standard time in transit files. After you import these files, the data from them appears in table form on the respective Geographic Code, Transit Days, and UCM Holidays screens. For descriptions of the function and formatting of these files, see Carrier Configuration > Import Time in Transit Files.
Manage Custom Rates, Routes, and Zones
Keep the following considerations in mind when managing rates, routes, and zones:
-
You must create methods for rates, routes, and zones at the carrier definition level in UCM in order to manage data for them at the carrier instance level in Parcel. If the methods do not exist in the carrier definition, no links to manage this data in Parcel exist.
-
If you are using routes or zones at the carrier instance level, you must have associated geographical code data at the instance level, either added at the carrier definition level in UCM or at the instance level in Parcel.
-
You cannot view any data added at the definition level but you can still use this data.
-
You can import custom data files for rates, routes, and zones.
See the Help topics under "Managing Custom Rates, Routes, and Zones."
Import Custom Data
You can import rates, routes, and zones in UCM. However, these types of data entered in UCM do not appear in the tables on Parcel configuration screens when you add an instance of this UCM carrier to a Parcel location. If you do not import or otherwise add this data into Parcel directly, Parcel uses the corresponding data set up in UCM. However, if you do add or import data for geographic codes, transit days, holidays, rates, routes, and zones into Parcel directly so that they appear in screen tables, then Parcel uses the data in the tables and not the data set up with the carrier definition in UCM. Additionally, whenever you import new data from a data file, old data is deleted and replaced by the new data. See the following Help topic: Import Custom Data.
Manage UI Elements
You can use the Manage UI Elements screen to add individual default values to a UI administrative element including an effective date, and import values with effective dates, as well as edit or delete these values. See the Help topics under "Managing UI Elements."
Shipper Defaults and Sequence Data
Shipper Defaults Screen and Tabs
UI Administrative elements that you create in UCM can appear as tabs on the Shipper Defaults screen. You can also create additional administrative screens. After you set up in your UCM carrier definition and add the carrier to a Parcel location, you can manage the administrative elements at the carrier instance level in Parcel by changing default values using the Parcel Web Admin tool. Defaults that you set in Parcel override those set in UCM. For example, if EOD consolidation is enabled by default in the carrier definition, it can be disabled by default in Web Admin. In general, settings and data for a specific carrier instance in Parcel override those in the UCM carrier definition.
By default, the UCM Shipper Defaults screen includes a Time in Transit tab with the following fields:
-
Calculate Transit Time – To specify calculation of transit times, select (check) this check box. Parcel uses the data that you import using the Import Time in Transit Files screen for transit time calculations.
-
Standard Saturday Delivery – Selecting this check box includes Saturday as a delivery day in time in transit calculations.
By default, the UCM Shipper Defaults screen also includes a Defaults tab with the following field: Units of Measure.
Sequence Data and Sequence Numbers
Sequence numbers created for a UCM carrier definition translate into a Sequence Data link and screen when in the Parcel carrier instance. The Sequence Data screen includes a tab for each sequence number created in UCM, as shown in the following example:
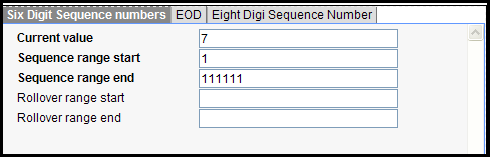
Sequence numbers are used with both tracking numbers and EOD manifests. After you add the carrier to Parcel, you can use this screen to configure the sequence numbers.
Note: There is a corresponding tab on the Parcel UCM carrier Sequence Data screen for each sequence number created for the carrier definition in UCM. The only default values set in UCM are the sequence number length and the amount by which a sequence number is increment. Use the tabs on this screen to set the actual values for the sequence numbers and ranges.
To configure sequence numbers...
-
In Parcel, under the UCM carrier, select the Sequence Data link.
-
Configure the data for each sequence number as described in the following table:
In this box...
Enter the following information....
Current value
Next value to be assigned from this sequence number.
Sequence range start
Beginning of the range of numbers this sequence number will generate.
Sequence range end
End of the range of numbers this sequence number will generate.
Rollover range start
Beginning of the rollover range.
Rollover range end
End of the rollover range.
-
Click SAVE or click CANCEL to cancel the operation.
Geographic Codes
You can use the Geographic Codes screen to add, edit, and delete values for Geographic Codes associated with a UCM carrier. See the following procedure.
Note: Geographic codes can be added when defining a UCM carrier, and these geographic codes can be used when the carrier is added to a Parcel location. However, geographic codes included in a UCM carrier definition are not displayed on the Geographic Codes screen in the Parcel Web Admin tool.
To add a geographic code....
-
In the Parcel Web Admin tool under the UCM carrier, click the Geographic Code link to display the Add Geographic Code screen, and then click plus
 to display the screen for adding a geographic code:
-
Enter values for the following fields:
In this field...
Do this...
Geocode
Enter the geographic code; for example, METFRADEU for Metropolitan Frankfurt, Germany.
Description
Enter the geographic code description; for example: "Metropolitan Frankfurt, Germany" (without quotation marks).
Country
From the drop-list, select the country for which the geographic code applies; for example: Germany
Region
Enter the state, province, or other region containing the postal code range; for example: Hesse
Note: Use the form that is applicable to Parcel for this UCM carrier. This may be a state/province code or the state, province, or other region spelled out.City
Enter the name of the city; for example: Frankfurt or Frankfurt am Mein.
Note: Use the form that is applicable to Parcel for this UCM carrier. It is important that this entry be spelled in exactly the form that Parcel recognizes.Postal Low
Enter the lowest postal code for the area included in the geographic code; for example: 60001
Postal High
Enter the highest postal code for the area included in the geographic code; for example: 60599
-
Click Save Changes to save your changes or click x to exit the screen without saving.
To edit, delete, or filter geographic codes...
-
To edit a row of geographic code data, select the row, and then click the pencil
 to display the editing screen. Fields are identical to the Add Geographic Code screen show in the previous illustration. Make any required changes, and then click Save Changes to save your changes or click Cancel to exit the screen without saving.
 -
To delete a row of geographic code data, select the row, and then click the Delete

. Note that no confirm dialog is displayed and there is no undo for this operation.
-
To filter a list of geographic codes, enter a filter criterion in the row with the filter

, and then click the filter
. For example, to filter by date, enter or select the date to filter by, and then click the filter
.
Transit Days and Holidays
In a UCM carrier, the screens that enable you to add transit days and holidays allow you to configure how weekends and holidays are managed with time in transit calculations.
Notes:
-
When you import a time in transit file or a holiday file, the data in this file appears in the table on the corresponding screen.
-
For information on how the time in transit flags (Saturday Delivery, Add Weekend Transit, Allow Delivery, Add Transit) on the Transit Days and Holidays screens behave, see the following table: Carrier Configuration > How TinT options are calculated.
Add Transit Days
To add services and geographic codes for transit time calculations...
-
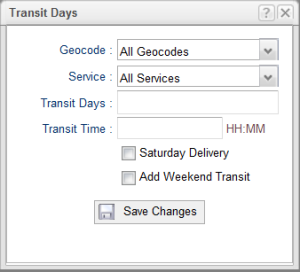
Click the Transit Days link under the UCM carrier, and then click the plus
to display the Add Record screen for entering transit days (shown in the following illustration with the defaults for the Geocode and Service fields):
-
Enter the following values:
-
From the Geocode drop-down list, select the geographic code for which you want to specify transit time or leave the default All Geocodes to apply the transit days to all geographic codes.
-
From the Service drop-down list, select the service for which you want to specify transit time or leave the default All Services.
-
In the Transit Days field, enter a whole number for the number of transit days to associate with the geocode(s) and service(s) specified in steps 2a and 2b; for example: 2
-
In the Transit Time field, enter a time in the form HH:MM.
-
If Saturday Delivery is allowed with this service for this geographic code, select the Saturday Delivery check box.
-
To add two days to the delivery date if Saturday and Sunday are not counted as transit days, select the Add Weekend Transit check box.
-
-
Click Save Changes to add this record to the table on the Transit Days screen or click Cancel to exit without saving.
Add Holidays
To add a holiday with transit time option for a carrier service...
-
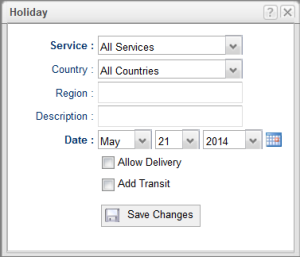
Click the Holidays link under a carrier that supports this option, and then click the plus
 to display the Add Record screen for entering transit days for services and Geographic codes:
-
Enter the following values:
-
From the Service drop-down list, select the service for which you want to specify a holiday or leave the default All Services.
-
From the Country drop-down list, select the country for which you want to specify a holiday or leave the default All Countries.
-
In the Region field, optionally enter the state, province, or equivalent region within the selected country (or leave blank if you selected All Countries for the previous value).
-
In the Description field, optionally enter a description of the holiday.
-
In the Date field, select the month, date, and year from these respective drop-down lists or click the calendar

and select a date.
-
If delivery on this holiday is allowed for this service and country, select the Allow Delivery check box.
-
To add one day to the delivery date if the holiday is not counted as a transit day, select the Add Transit check box.
-
-
Click Save Changes to add this record to the table on the Holidays screen or click x to exit without saving.
Edit, Delete, or Filter Transit Days or Holidays
-
To edit a row of UCM carrier transit days or holidays data, select the row with the data, and then click the pencil
to display the editing screen. Fields are identical to the Add screens show in the previous illustrations. Make any required changes, and then click Save Changes to save your changes or click Cancel to exit the screen without saving. -
To delete a row of transit days or holidays data, select the row, and then click the Delete
. Note that no confirm dialog is displayed and there is no undo for this operation.
-
To filter a list of transit days or holidays, enter a filter criterion in the row with the filter
, and then click the filter
. For example, to filter by date, enter or select the date to filter by, and then click the filter
.
Managing Custom Rates, Routes, and Zones
Updating Rates and Routes
You can use the following screens to update values for rates, routes, and zones:
-
Manage Custom Rates
-
Manage Custom Routes
Managing Custom Rates
To manage custom rates...
-
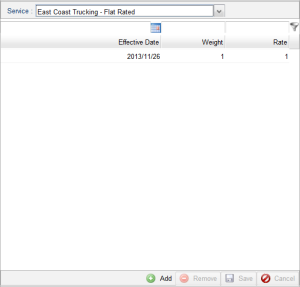
In the Parcel Web Admin tool under the UCM carrier, click the Manage Custom Rates link to display the Manage Custom Rates screen:
-
Under the Services bar, select a Service to manage rates for from the drop-down list. This selection displays any existing rates that were added for this service in Parcel by using this screen or importing a data file. (See Carrier Configuration > Importing Custom Data .)
-
Carry out the following tasks:
-
To add a row of rate data, click the plus
to display a blank row. Click click the calendar
to specify an Effective Date for the rate or enter a date in the form YYYY/MM/DD, and then enter the remaining data for the rate. (This varies according to the type of rating method. See Carrier Configuration > Rate File Formats .)
-
To delete a row of rate data, select the row, and then click the Delete
. (Note that no confirm dialog is displayed and there is no undo for this operation.)
-
To filter a list of rates, enter a filter criterion in the row with the filter
, and then click the filter
. For example, to filter by date, enter or select the date to filter by, and then click the filter
.
-
-
Click Save Changes to save your changes or click Cancel Changes to revert to the original values.
Managing Custom Routes
To manage custom routes...
-
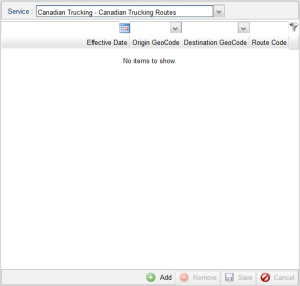
In the Parcel Web Admin tool under the UCM carrier, click the Manage Custom Routes link to display the Manage Custom Routes screen:
-
Under the Services bar, select a Service to manage routes for from the drop-down list. This selection displays any existing routes that were added for this service in Parcel by using this screen or importing a data file.
-
Carry out the following tasks:
-
To add a row of route data, click the plus
to display a blank row. Click the calendar
to specify an Effective Date for the route or enter a date in the form YYYY/MM/DD, and then enter the remaining data for the route. (See the following Help topic: Route and Zone File Formats .)
-
To delete a row of route data, select the row, and then click the Delete
. (Note that no confirm dialog is displayed and there is no undo for this operation.)
-
To filter a list of routes, enter a filter criterion in the row with the filter
, and then click the filter
. For example, to filter by date, enter or select the date to filter by, and then click the filter
.
-
-
Click Save Changes to save your changes or click Cancel Changes to revert to the original values.
Rate File Formats
The following file formats are current supported for import of Rate information. This list will be expanded as the need arises for other formats.
Note: The rate file itself does not include Effective Date. You specify Effective Date for all rates in the file when importing the file in the Rate Import dialog.
Flat Rate based rating
This type of rate file is used with the Flat Rated rating method. The file must be Comma Separated format (CSV) and contain the following columns headers on the first row:
zone,weight,rate
Note that the zone column does need to be included (as a leading comma) even if you do not use zones with this rating method.
Note: This file format is identical to the format for weight-based rating. See the section "Weight based rating" for an example.
Freight Class based Rating
This type of rating is used with freight carriers (LTL and TL) using freight-class rating based on weight breaks. You define the weight range and corresponding rate in the Rates and Weight Break tables.
A freight-class based rate file has a Comma Separated format (CSV) and contains the following columns headers on the first row:
zone,weight,rate,freight_class,mincharge
Note: The zone and mincharge (minimum charge) columns are optional. The following example includes zone and mincharge.
Sample freight class based rate file with zone and mincharge
|
zone,weight,rate,freight_class,mincharge
|
Volume based rating
This type of rate file is used with the Flat Rated rating method. The file must be Comma Separated format (CSV) and the column names must be formatted as follows:
zone,weight,rate
Note that the zone column does need to be included (as a leading comma) even if you do not use zones with this rating method.
Note: This file format is identical to the format for weight-based rating. See the following section for an example.
Weight Break based rating
This type of rate file is used with the Weight Break Rated rating method. The file must be Comma Separated format (CSV) and contain the following columns headers on the first row:
zone,weight,rate
Note that the zone column does need to be included (leading comma) even if you do not have zones for the rating method (see the following example).
Sample Weight Break based rate file
|
zone,weight,rate
|
Piece Count based rating
This file format is used with the Piece Count Rated rating method. The "unit" column contains the number of pieces. The file must be Comma Separated format (CSV) and contain the following columns headers on the first row.
zone,unit,rate
Note that the zone column does need to be included (leading comma) even if you do not have zones for the rating method (see the following example).
Sample Unit Based Rate File
|
zone,unit,rate
|
Distance based rating
This file format is used with the Distance Rated rating method. The file must be Comma Separated format (CSV) and contain the following columns headers on the first row:
unit,weight,rate
Sample Distance Based Rate File
|
unit,weight,rate
|
Route and Zone File Formats
The following sections describe route and zone file formats with examples.
Route File Format
A route file must be Comma Separated format (CSV) and the column names must be formatted as follows:
origin,destination,route_code
Values in the columns are as follows:
-
origin – origin geographic code
-
destination – destination geographic code
-
route_code – route code
Notes:
-
For route files, you specify Effective Date when you import the file.
-
You can specify the value ALL for origin and destination geographic codes. For information on geographic codes, see the topics under "Geographic Codes."
The following is an example of a route file:
|
origin,destination,route_code
|
Zone file format
A zone file must be Comma Separated format (CSV) and the column names must be formatted as follows:
origin,destination,zone_code
Values in the columns are as follows:
-
origin – origin geographic code
-
destination – destination geographic code
-
zone_code – zone code
Notes:
-
For zone files, you specify Effective Date when you import the file.
-
You can specify the value ALL for origin and destination geographic codes. For information on geographic codes, see the topics under "Geographic Codes."
The following is an example of a zone file:
|
origin,destination,zone_code |
Importing Custom Data
You can import rates, routes, and zones using the Import Custom Data screen.
Note: For the formats of each type of data file, see the following Help topics:
-
Carrier Configuration > Rate File Formats
-
Carrier Configuration > Route and Zone File Formats
To import custom data...
-
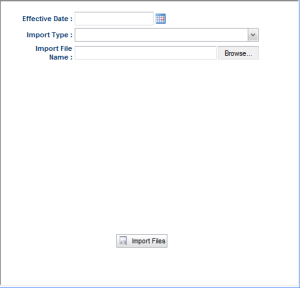
In the Parcel Web Admin tool under the UCM carrier, click the Import Custom Data link to display the Import Custom Data screen:
-
Click the calendar
and specify an effective data for the rates, routes, or zones that you are importing.
-
From the Import Type drop-down list, select one of the following types of objects, together with its associated UCM carrier service, for which you are importing a file with values:
-
Rate
-
Route
-
Zone
-
-
Click Browse to open the Windows Choose File to Upload dialog, then select the effective date file to import and click Open.
-
On the UI Elements Import dialog, click Import to import the file. Parcel now displays this data on the appropriate "Manage" screen for the selected service. See the following Help topic: [ Adding Rates, Routes, and Zones|Carrier Configuration0#Manage_Custom_Rates] .
Managing UI Elements
Add, Edit, or Delete a UI Element Value
You can use the Manage UI Elements feature to accomplish the following tasks:
-
Edit existing default values for a UI administrative element.
-
Add a new default value for a UI administrative element and specify an effective date for this value.
-
Import a file with default values for a UI administrative element together with effective dates for these values.
-
Delete existing default values from a UI administrative element.
-
Restore the original default value for a UI administrative element.
Accessing the Edit UI Element Values screen
To access the Edit UI Elements Values screen for a UI administrative element...
-
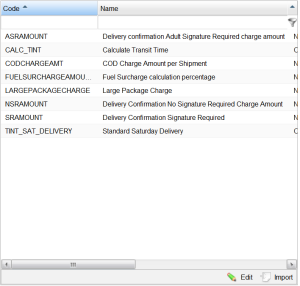
In the left pane of the Parcel Web Admin tool under the UCM carrier, click the Manage UI Elements link to display the set of available UI administrative elements, as shown in the following example:
-
Double click the UI administrative element you want to edit to display the Edit screen with the values for this element, as shown in the following example:
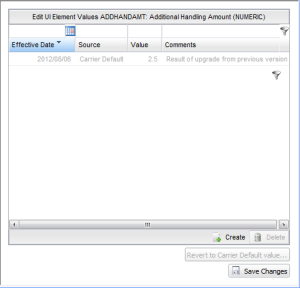
Note: You cannot edit the Source field, which refers to the function of the element. When creating a new value, this field is also non-editable.
Editing an Existing Value
To edit a default value for a UI administrative element
-
On the Edit UI Element Values screen, click the filter
to activate the data row(s) for editing.
-
Double click the row with the value you want to edit to make the fields editable.
-
Carry out one or a combination of the following tasks:
-
To change the Effective Date for the value, click the calendar
, and then select the new date.
-
To change the value, type in the new value.
-
If desired, update the comment.
Note: If the data type is Checkbox, a checkbox is displayed in the Value column. You can select or clear (deselect) this check box to indicate the default value.
-
-
Click Save Changes to save your changes.
Creating a Value
To create a new default value with an effective date
-
On the Edit UI Element Values screen, click Create to display a blank row.
-
Carry out the following tasks:
-
To enter the Effective Date for the value, click the calendar
, and then select the date. (This field is required.)
-
Type in the value. (This field is required.)
-
If desired, include a comment. (This field can be left blank).
-
-
Click Save Changes to save your changes.
Deleting a Value
To delete a value
-
On the Edit UI Element Values screen, click the filter
to activate the data row(s).
-
Select the row with the value you want to delete, and then click Delete.
-
Click Save Changes to save your changes.
Restoring a value
To restore a value to the original default:
-
On the Edit UI Element Values screen, click the filter
to activate the data row(s).
-
Select the row with the default value you want to restore, and then click Revert to Carrier Default Value.
Note: This action restores the value and effective date (and any comment) to the data that were entered for this UI element when the carrier was defined in UCM. -
Click Save Changes to save your changes.
Import an Effective Date File with Values
You specify a date on which additional default values for UI administrative text or numeric fields go into effect by importing a file with these values that includes the effective date.
Importing a file
To import a file with UI element values and effective dates...
-
In the left pane of the Parcel Web Admin tool under the UCM carrier, click the Manage UI Elements link to display the set of available UI administrative elements, as shown in the following example:

-
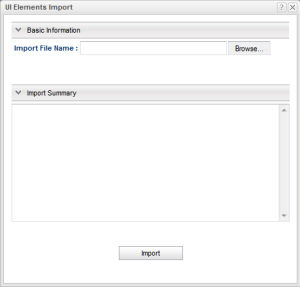
Click Import Values by Date to display the UI Elements Import dialog.
Note: You do not need to select a UI Administrative Element in the list. The code field in the file identifies this element.
-
Click Browse to open the Windows Choose File to Upload dialog, then select the effective date file to import and click Open.
-
On the UI Elements Import dialog, click Import to import the file.
Note: The Import Summary message tells you that the import was successful or provides detailed error messages enabling you to fix any incorrect formatting in the file.
Format for effective date file
The requirements for an effective date file are as follows:
-
The values must be for one of the following data types:
- Text
- Numeric
Note: If you attempt to import a file for any other data type, you will receive an "Invalid data type" error. -
The effective date must be the current date or later. An earlier date than the current date returns an error.
-
An effective date file must be a comma-separated (CSV) file with the following format:
effectivedate,code,value,comment
These values are as follows: -
effectivedate – The effective date must have the form: YYYY/MM/DD; for example: 2012/11/09
-
code – The code of the UI administrative element for which the value is being imported.
-
value – The default value for the UI administrative element that goes into effect on the specified date.
-
comment – If this field is left blank, it must still have a leading comma (see the following example)
The following example shows date-effective values for a numeric field called Additional Handling Amount:
|
effectivedate,code,value,comment
|