Global Settings
Add Location
You can add as many locations as are allowed by your Parcel license. Each location is a "Ship From" ID or 'distribution center' (DC). You select a DC or "Ship From" ID when you ship a package in the Parcel shipping application.
After you add locations, you can
add carriers (see the section Carrier Configuration > How To Add a Carrier)
to each of the locations. You can add more than one instance of the same carrier to each location.
Note: You can also use the
Add Location screen to configure a default Alternate Return Address and Alternate Remittance Address for the following carriers that support this function:
-
FedEx
-
FedEx Ground® Economy
-
UPS (all origins)
See the
section To specify an Alternate Return Address and/or Alternate Remittance Address
.
To add a location, complete these steps:
-
Click the Add Location link under the Global Settings section.
-
On the Location Details tab, Complete the boxes on the screen as follows:
In this box...
Do this...
Shipper ID
Enter a short ID for this location.
For, this shipper ID (or 'DC ID') must match the Ship From customer number that you have configured in your Server.
Notes: This is a Required field. The maximum number of characters allow for the value of this field is 20.
Locations are listed in the left pane of the Web Admin tool according to the order of the Shipper ID. For example, a Shipper ID of 123 is higher in the list than a Shipper ID of 124.Display Name
Enter a name for this location.
This name appears in the left-hand pane of this Configuration Tool. Also, this is what you would select in the Ship From the list in the shipping application when you are shipping a package.
Note: This is a Required field. The maximum number of characters allow for the value of this field is 35.Description
Enter a description for the location such as 'main shipping dock'.
Sender Attention
Name of person or department that is sending the package or that should receive the package if it is returned.
Ship From Company
Enter the company name of the location.
Note: This a Required field. The maximum number of characters allow for the value of this field is 25.Address 1
Enter line one of the Ship From address (the primary address information – street no., etc.).
Note: This a Required field. The maximum number of characters allow for the value of this field is 45.Address 2
Enter any additional address information such as building number, suite, or floor.
Address 3
Enter any additional address information such as building number, suite or floor.
City
Enter the city of the location.
Note: This a Required field. The maximum number of characters allow for the value of this field is 45.State/Province
If a drop-down list is available, select the state or province of the location from the list. Otherwise, Enter the two-letter abbreviation for the state or province code.
Postal Code
Enter the ZIP Code or postal code of the location.
Country
From the drop-down list, select the country of the location. This a Required field.
Note on supported carriers: Carriers supported by Parcel depend on the Country of the location. For supported carriers for US, Canada, and UK locations, see the section Supported carriers for US, Canada, United Kingdom
(UK), Europe. For other locations, first add the location, and then check which carriers are displayed under that location in the Web Admin tool (left panel). You can add only supported carriers to a location.Phone
Enter a telephone number for the location.
Note: The is a Required field. The maximum number of characters allow for the value of this field is 20.Fax
Enter a fax number for the location.
Email
Enter an e-mail address for the location.
Time Zone
From the drop-down list, select the time zone of the location. This a Required field.
DC Cost Center
Enter the cost center of the distribution center.
Company ID
Enter the company ID for the location.
Address Type
From the drop-down list, select the address type for the location.
-
Click SAVE in the lower-right corner of the screen to save your changes. Or click CANCEL to cancel adding a new location.
-
If you clicked SAVE, the new location is added to the left-hand pane of the Configuration Tool.
-
If a message appears towards the top of the screen stating 'Please restart DI', select the System menu, then select Parcel Refresh and click Refresh.
-
After you create a location, you can create users and assign them to the location. See the System > User Accounts - Overview help topic for more information.
You can edit the information you Entered when adding a location by selecting Settings under the location you want to edit.
To specify an Alternate Return Address and/or Alternate Remittance Address
-
On the Add Location screen, select the Return Address tab or the Remittance Address tab.
Note: The Return Address and Remittance Address tabs are identical. -
Complete the boxes on these screens as follows:
In this box...
Do this...
Attention To
Enter the name of the contact person at the alternate address.
Company Name
Enter the company name for the alternate address.
Address 1
Enter the street address of the alternate address. This is a required field.
Address 2
Enter any additional address information such as building number, suite, or floor.
Address 3
Enter any additional address information such as building number, suite or floor.
City
Enter the city of the alternate address. This is a required field.
State/Province
If a drop-down list is available, select the state or province of the alternate address from the list. Otherwise, Enter the two-letter abbreviation for the state or province code. This is a required field.
Postal Code/ZIP
Enter the ZIP Code or postal code of the alternate address. This is a required field.
Country
From the drop-down list, select the country of the alternate address. This is a required field.
Phone
Enter a telephone number for the alternate address.
-
Click SAVE in the lower-right corner of the screen to save your changes. Or click CANCEL to cancel adding an alternate address.
Note: Alternate Return Address and Alternate Remittance Address are sub-tabs on the Return To tab on the Warehouse screen. For more information on how Parcel can use the information entered on the Add Location screen to populate the fields on these Warehouse screen tabs, see the following Help topic: Processing a Shipment - Return To Tab and Alternate Address Sub-tabs.
Supported carriers for US, Canada, United Kingdom (UK), Europe
The following table lists the supported carriers for the US, Canada, the UK, and Europe. (Carrier names are given as they appear in the Web Admin).
Note: When you are adding a carrier to a location, only the carriers supported for a given country appear in the drop-down list of carriers for the country specified in the Location address.
|
Origin |
Supported Carriers |
|
United States |
|
|
Canada |
|
|
United Kingdom (UK) |
|
|
Europe |
|
Delete Location
You can delete any of the locations that you have configured in Parcel. You must be logged in as Administrator or Enterprise Administrator to delete a location
To Delete a Location
-
From the System menu, select Settings > Locations.
-
Under Global Settings in the Configuration tree on the left-hand pane, select Delete Location.
The Delete Location screen is displayed in the right-hand pane. -
From the Location drop-down list, select the location that you want to delete.
-
Click DELETE at the lower right of the screen or click CANCEL to cancel out of the process.
-
In the confirm deletion dialog box that is displayed, click OK to carry out the deletion or click Cancel to cancel it.
If you click DELETE and OK, the location you deleted is no longer displayed in the Configuration tree (all the configured carriers under this location are deleted as well).
Corporate DSN
Configuring data sources for the Corporate Address Book
On the Corporate DSN screen, Parcel enables you to specify a separate data source name (DSN) for each of two Corporate Address data sources. This feature also allows you to use an existing address data source that may have a different design or structure from the Parcel Address tables without first importing it into Parcel. You can use the Corporate DSN screen to specify the following DSNs:
-
Address DSN
-
Group DSN
You can create and submit strings for data sources with the following formats for specifying a DSN:
-
MySQL– Data source: Parcel sordb database (default)
-
Excel – Data source: Excel file (.xls)
-
CSV/Text – Data source: CSV or Text file (.asc, .csv, .tab, .txt)
In addition, this screen enables you to submit custom Address and Group queries. The following sections describe how to specify Corporate DSNs and submit queries.
Caution: To avoid issues when working with different DSN formats, see the section Best practices for Corporate Address files.
What is a data source name (DSN)?
A DSN is a data structure containing information about a specific data source (database or other data source; for example an Excel file) that an Open Database Connectivity (ODBC) driver needs to connect to this source. A DSN stores the following information:
-
Data source name
-
Data source driver
-
Data source directory
-
User ID for database access (if required)
-
Password for database access (if required)
Specifying DSNs and submitting custom queries
To specify DSNs and submit queries...
-
In the top section of the screen, carry out one of the following steps:
To use the default Address DSN or Group DSN, select (check) the check box next to the respective field. Selecting this check box displays the non-editable default string for the associated DSN. (This is the MySQL DSN string in the following table.) This action also displays the non-editable default queries for this DSN Enter.
To specify an Address DSN or Group DSN that is different from the default and to submit custom queries for this DSN Enter, deselect (uncheck) the check box next to the respective field, and then go to step 2.
Notes:
String formats are the same for both the Address DSN and Group DSN fields.
Microsoft DSN drivers are available on the Microsoft Web site. -
Optionally, with the check box next to the field for the Enter of DSN for which you want to submit the query deselected (unchecked):
a. Paste your customized DSN string in the DSN field.
The following table provides templates for the allowable formats for custom DSN strings:
String for DSN Format Enter
Template/example
MySQL (default)
dsnname=sordb;driver=com.mysql.jdbc.Driver;url=jdbc:mysql://localhost/ sordb;database=sordb;user=sn_usr;password=shipnowdb;dialect=;
Excel
dsnname=xlsdb;driver=sun.jdbc.odbc.JdbcOdbcDriver;url=jdbc:odbc:Driver={Microsoft Excel Driver (*.xls)};Dbq=<path_name/filename>.xls; DefaultDir=<path_name>;
For example:
dsnname=xlsdb;driver=sun.jdbc.odbc.JdbcOdbcDriver;url=jdbc:odbc:Driver={Microsoft Excel Driver (*.xls)};Dbq=c:/temp/Book1.xls; DefaultDir=c:/temp/;CSV/Text
dsnname=csvdb;driver=sun.jdbc.odbc.Jdbc
OdbcDriver;url=jdbc:odbc:Driver={Microsoft Text Driver (*.txt~ *.csv)}
~Dbq=<path_name>~Extensions=asc,csv,tab,txt~;
For example:dsnname=csvdb;driver=sun.jdbc.odbc.Jdbc
OdbcDriver;url=jdbc:odbc:Driver={Microsoft Text Driver (*.txt~ *.csv)}
~Dbq=c:/temp/~Extensions=asc,csv,tab,txt~;b. Paste your custom query or queries in the appropriate fields described in the following table:
Query Enter
Query name and function
Address
-
Address Selection Query – Select customer addresses from your Corporate Address table.
-
Address Search Query – Return a list of addresses based on user-supplied search criteria. Parcel displays these addresses on the Corporate Address Book Search screen, as well as in the predictive drop-down list in the Customer Code field on the Warehouse screen and the Desktop.
Group
-
Group Selection Query – Select group details from the Corporate Group table.
-
Group & Address Relation Selection Query – Select customer addresses associated with a particular corporate group address table. Use this query in conjunction with performing group shipments.
-
Group Search Query – Return a list of groups based on user-supplied search criteria. Parcel displays these groups on the Corporate Address Book screen, as well as in the predictive drop-down list in the Customer Code field on the Warehouse screen.|
Caution: Parcel does not validate your custom queries. Use your database query editor to validate queries before submitting them using the Corporate DSN screen. Also note that any modification in the alias name can cause a query to fail. You must maintain the same aliases as those provided by Parcel.
-
-
Click UPLOAD at the bottom of the screen to enable your DSN settings and upload all queries.
Note: Parcel uses the default values for the Address DSN if no value if no value is entered in the Address DSN field and the default values for the Group DSN if no value if no value is entered in the Group DSN field.
Best practices for Corporate Address files
Excel can read CSV files and can thus serve as a DSN with CSV files for the Corporate Address book. However, this approach is not recommended due to the following limitation on Excel functionality.
When importing a CSV file, Excel automatically assumes that every field containing only numbers is numeric and makes a default conversion to a numeric data Enter. Thus, if you import a CSV file with phone, extension, or fax numbers into Excel, Excel recognizes these strings as numbers and converts them to numeric. (This is because CSV files are basically text files and therefore cannot specify data Enter.) If you then use this Excel file as your Corporate Address DSN, the Corporate Address Book displays these numbers in Excel form.
For example:
|
Excel converts the following CSV alphanumeric string.... |
To the following numeric form... |
|
Phone number 4039349733 |
4.039349733E9 |
|
Extension 123 |
123.0 |
Best practices for using Excel and CSV files as DSNs are as follows:
-
For an Excel DSN, use native Excel files and not CSV/Text files imported into Excel. When using native Excel files, design the spreadsheet to indicate which columns to treat as alphanumeric strings (for example, phone and fax numbers) and which columns to treat as numeric. When customizing the DSN strings ( see the section Specifying DSNs and submitting custom queries) at the top of this screen, specify the Excel driver.
-
For a CSV/Text DSN, when customizing the DSN strings ( see the section Specifying DSNs and submitting custom queries) at the top of this screen, specify the TEXT driver not the Excel driver.
CloseConfig
You can configure how the Close and Upload appear for a specific carrier on the Close Manifest screen.
Configure Close and Upload buttons
-
From the System menu, select Settings > Locations.
-
Under Global Settings in the Configuration tree in the left-hand pane, click the CloseConfig link.
The CloseConfig screen is displayed in the right-hand pane. -
To add a Close Configuration for a carrier, click ADD icon at the top of the screen. The Add Record dialog box appears.
-
Complete the boxes according to the following table. Note: The default value for all the fields with drop-down lists is Yes.
In this box...
Do this...
Carrier
Enter the name of the carrier for which you want to configure the Close and Upload options.
Close Button
Accept the default value of Yes if you want the Close button to be displayed; otherwise, select No from the drop-down list if you do not want the Close button displayed.
Merged Uploaded Record
Accept the default value of Yes if you want to merge uploaded records.
Upload Button
Accept the default value of Yes if you want the Upload button to be displayed; otherwise, select No from the drop-down list if you do not want the Upload button displayed.
Close Button Description
If you are accepting Yes for Close Button, Enter a description of the Close button in this field.
PLD_ADF
Accept the default value of Yes if you want the PLD_ADF API key to be enabled; otherwise, select No from the drop-down list if you do not want the PLD_ADF API key enabled.
Note: PLD and ADF files are UPS upload files.Upload Button Description
If you are accepting Yes for Upload Button, Enter a description of the Upload button in this field.
Interim Close
If the carrier requires an Interim Close, accept the default value of Yes; otherwise, select No from the drop-down list.
Note: An interim Close is for a carrier that accepts more than one close per day. All Closes prior to the End-of-Day close are interim Closes. Accepting the default of Yes means that the Interim Close button is displayed and enabled on the Parcel UI.BBX Close Description
If you are using Break Bulk Express (BBX) with a DHL Global carrier and are accepting the default value of Yes for BBX Close, Enter the BBX Close description here.
BBX Close
If you are using Break Bulk Express (BBX) with a DHL Global carrier, accept the default of Yes; otherwise, select No from the drop-down list if you do not want BBX Close enabled.
Notes:-
Accepting the default of Yes means that the BBX Close button is displayed and enabled on the Parcel UI.
-
For more information on BBX and BBX Close, see the following section: DHL Global (XML-PI) >Break Bulk Express
Auto Upload
If you want Auto Upload enabled, accept the default of Yes; otherwise select No from the drop-down list if you do not want Auto Upload enabled.
-
-
Click SAVE to save the record details entered. Otherwise, click CANCEL to cancel this operation.
E2Net Watermill Integration
The integration of Watermill enables usage of single interface to use multiple products such as Global Trade Management (GTM/TA).
To configure the application for integration with Watermill:
-
Go to System > Settings > Locations > Global Settings.
-
Enable the checkbox at Watermill Integration to insert data into E2Net database.
-
Provide the information in the fields as defined.
Field Name
Description
Tenant
Watermill Tenant Code
Host
Host of the watermill server
Port
Watermill server Port
Username
Username to authenticate Watermill Integration
Password
Password to authenticate the Watermill Integration
Secure Connection
Secure Connection to the Watermill Integration
Retry
Retry Attempts to the Watermill Integration connection
-
Click Save.
Tracking Module Export Carriers
Tracking module provides supply chain visibility for the shipment processed through Parcel application. User can search one or more tracking number and will able to see the end-to-end shipment movement on UI of tracking module. An inbulit help file has been incorporated to guide know-how of this module.
Use the Tracking Module Export Carriers screen under Global Settings in the Parcel Web Admin tool to add, edit, or delete carriers for use with Tracking Module.
To add a Tracking Module Export Carrier:
-
Click ADD icon at the top of the screen to display the Add Record dialog box.
-
Complete the boxes as follows:
In this box...
Do this...
Carriers
Select the Carrier from the drop-down list of available (configured) carriers.
Effective Start Date
Enter the Effective Start Date for the association of this carrier with Tracking Module. This date must have the following form: YYYYMMDD; for example, June 8, 2017 would be: 20170608
Include In CT Extract
From the drop-down list, select "Y" or "N" to indicate if this carrier is to be included in the CT Extract (Y) or not (N).
Include In Tracking Extract
From the drop-down list, select "Y" or "N" to indicate if this carrier is to be included in the Tracking Extract (Y) or not (N).
-
Click SAVE to save the carrier and display it in the table on the Tracking Module Export Carriers screen. Otherwise, click CANCEL to cancel adding the carrier.
To edit a Tracking Module Export Carrier:
-
Click EDIT icon in the left column in the row containing the carrier that you want to edit.
A dialog box appears. -
Edit the fields as needed (see the previous table).
-
Click SAVE at the bottom of the dialog box to save any changes.
Delete a Tracking Module Export Carrier:
-
Click the DELETE icon in the left column in the row containing the record that you want to delete.
A confirmation dialog box displays. -
Click OK to delete the record or click CANCEL to keep the record.
Control Tower Integration
Parcel now supports integration with the Control Tower application by enabling the configuration of a Control Tower carrier under Global Settings. This integration facilitates communications between Parcel and Control Tower, as well as providing the ability to transmit and receive data from Control Tower Application.
The following international carriers that Parcel supports can be configured for use with Control Tower as an export carrier:
- UPS US
- FedEx US
Control Tower Integration now also includes improved package tracking capability
|
In this box... |
Do this... |
|
Export File Version |
Enter the Export file version to be used for preparing unique file names. |
|
Upload Retry Attempts |
Enter the number of retry attempts to upload data if any communication error occurs. |
|
Archive Directory |
Path to folder where the uploaded Billing and Expense Data should be archived. |
Click SAVE to save the changes you entered or click CANCEL to cancel this operation.
Dangerous Goods Data
Use the Dangerous Goods Data screen in the Global Settings section to add, edit, or delete Dangerous Goods data for use when shipping Dangerous Goods packages with any carrier.
Notes:
-
Your Parcel installation includes a set of pre-configured Hazmat Codes that populate this table. You can add or delete codes and modify the information in this table as necessary.
-
After a Dangerous Goods Code is selected for an item in a shipment, values for these fields automatically populate the corresponding fields on the Item sub-tab of the Warehouse Options screen Dangerous Goods tab.
Add a Dangerous Goods Material
-
Click ADD icon at the top of the screen. The Add Record dialog box appears.
-
Complete the boxes as follows:
In this box...
Do this...
Dangerous Goods Code
Enter a unique code to identify this hazardous material.
When you process a dangerous goods package in Parcel, you select the Dangerous Goods code from the Dangerous Goods Code list in the Options dialog box.Description
Enter a description of the dangerous goods material.
Proper Name
Enter the proper shipping name of the commodity from the IATA Dangerous Goods Regulation Manual.
Technical Name
Enter the technical name for all commodities whose proper shipping name ends in 'n.o.s.' ('not otherwise specified'). The technical name is a more detailed description of the commodity.
Class
Enter the category of the commodity as defined in the IATA Dangerous Goods Regulation Manual.
Sub Risk Class
Enter the category of subsidiary risks assigned to this commodity. Some dangerous goods have properties that meet more than one Sub Risk class. The less serious property is referred to as the Subsidiary Risk.
UN Number
Enter the identification number assigned to this commodity by the United Nations. This can be found in the IATA Dangerous Goods Regulation Manual.
Packing Group
Enter the Packing Group assigned to this commodity by the United Nations.
Quantity
Enter the amount of the commodity that you are shipping in a single container (based on the unit of measure you will select in the Units list).
Units
Enter the unit of measure that the commodity is measured in the appropriate unit of measure. This should match the units listed in the IATA Dangerous Goods Regulation Manual. For example, the acceptable units of measure are: L, g, kg, kg G.
-
L - liters (for liquids)
-
g - grams (for solids)
-
kg - kilograms (for solids)
-
kg G - gross total package weight in kilograms instead of the net weight of only the commodity in kilograms.
-
Deciliters
-
Gallon
-
Kiloliters
-
Milligrams
-
Milliliters
-
Ounces
-
Pint
-
Pounds
-
Quart
-
Ton
Cargo Aircraft
If the commodity cannot be shipped on a passenger aircraft, Enter "Y" in this field; otherwise, Enter "N".
Limited Qty
If there is a limited quantity of the commodity in the package, Enter "Y" in this field; otherwise, Enter "N". If the value for this field is "Y", this also means that the package was prepared in accordance with the limited quantity packing instructions. (In this case, the Packing Instructions begin with a "Y".)
Reportable Qty
For packages moving into or out of the United States, Enter "Y" in this field if the commodity must be reported to the appropriate government agency in the case of a spillage; otherwise, Enter "N". See the 49 CFR for a table of reportable quantities.
Special Prov.
Enter the Special Provision Number from the IATA Dangerous Goods Regulation Manual.
Packing Inst.
Enter the Packing Instruction Number that this package was prepared under. This can be found in the IATA Dangerous Goods Regulation Manual.
Concentration
Enter the percentage of the dangerous commodity that is contained in the mixture being shipped in the package. This is required for these UN numbers: 1796, 1826, 1873, 2031.
Packing Enter
Enter a description of the Enter of packaging used to contain the commodity. For example, Steel Drum.
The packaging Enter description can also include the IATA packaging Enter code (in parenthesis) as supplemental information but it must follow the text description; for example, "Steel Drum (1A1)" or "Fiberboard Box (4G)". You can add the code in parenthesis following the text description in this field.Authorization
Enter the statement indicating any important information about certificates or authorities required to authorize the shipment or its preparation or packing. LTD. Qty. appears if limited quantity provisions apply to the commodity. Authorizations are detailed in the IATA Dangerous Goods Regulation Manual.
Dangerous Goods Label
Enter the Dangerous Goods labels that must appear on the package containing this commodity. See the IATA Dangerous Goods Regulation Manual.
Exception No
If you have an exception or exemption number for shipping this commodity, Enter that number.
Adr. Item No
Enter the ADR Item number. This is only used by UPS for intra-European Union hazardous materials shipments (not currently supported).
adrgrpltr
Enter the ADR Packing Group letter. This is only used by UPS for intra-European Union hazardous materials shipments (not currently supported).
Package Qty
Enter the number of identical containers that are in the overpack or 'all packed in one' box. Each container must have the same UN number, proper shipping name, technical name, packing group, packing Enter, quantity, and unit of measure.
Max Qty
Enter the maximum amount of the commodity allowed on an aircraft. This is used to determine the Q-value. The Q-value is the percentage of the commodity that you shipped relative to the maximum quantity allowed. A Q-value of 0.75 means that the package contains 75% of the maximum quantity allowed.
Addition Desc.
Enter any additional information that might apply to the shipment. For example, 'Keep package away from sun and all sources of heat.' The information prints on the documentation for the package. See the IATA Dangerous Goods Regulation Manual.
Emergency Response Contact
Enter the contact in case of an emergency related to this Enter of item.
Caution: The maximum length of this field is 35 characters. However, due to font and space restrictions, Parcel only prints as many characters as can fit on a particular dangerous goods/hazardous materials form. You need to determine what the maximum number of characters for the form on which this information is printed and limit the value of this field to that number.
Notes:-
For Level 1 – Level 2 carriers, Parcel displays this Emergency Response Contact on the Item sub-tab of the Dangerous Goods tab on the Warehouse Options screen when the Hazmat Code for this item is selected from the Hazmat Code drop-down list. You can change the contact in this Item field on an item-by-item basis if needed. Parcel uses this value as the contact for the specific item in the shipment. If this field is left blank, Parcel does not display any value on the Item sub-tab.
-
You can also enter Emergency Contact information for a specific location on the General tab of the Location Settings Shipper Defaults screen .
-
For additional information on how Parcel uses Emergency Contact information, see the following Help topic: Carrier Compliance - Dangerous Goods (Hazmat). |
Emergency Response Phone
Notes:
-
For Level 1 – Level 2 carriers, Parcel displays this Emergency Response Phone (number) on the Item sub-tab of the Dangerous Goods tab on the Warehouse Options screen when the Hazmat Code for this item is selected from the Hazmat Code drop-down list. You can change the phone number in this Options field on an item-by-item basis if needed. Parcel uses this value as the contact number for the specific item in the shipment. If this field is left blank, Parcel does not display any value on the Item sub-tab.
-
You can also enter Emergency Contact information for a specific location on the General tab of the Location Settings Shipper Defaults screen .
-
For additional information on how Parcel uses Emergency Contact information, see the following Help topic: Carrier Compliance - Dangerous Goods (Hazmat). item. |
radnuclide
Enter the radionuclide assigned to the substance being shipped. A table of basic radionuclides is available in the IATA Dangerous Goods Regulation Manual; for example: aluminum (13) has the radionuclide A1-26.
radactivity
Enter a measurement of the activity of the shipment. For fissile material, the weight of the material in grams or kilograms may be substituted for the radioactivity.
radactuom
Enter the unit of measure that the radioactivity was measured in. This must be in becquerel units (or multiples thereof), as follows:
-
Bq (becquerel)
-
kBq (kilobecquerel)
-
MBq (megabecquerel)
-
GBq (gigabecquerel)
-
TBq (terabecquerel)
-
PBq (petabecquerel) |
radactpackingtype
Enter a description of the Enter of packaging the radioactive substance is contained in. Acceptable packaging Enters are listed in the IATA Dangerous Goods Regulation Manual.
radactlabel
Enter the label Enter for the package. The Enters are:
-
W1 (White I)
-
Y2 (Yellow II)
-
Y3 (Yellow III)
radacttransportidx
Enter a number based on the radiation exposure of a package. This is determined based on the maximum measurement of the radiation in mrem/h at a distance of 1 meter from the package surface.
radactcriticalsafetyidx
Enter the measurement for packages containing fissile material. The measurement is determined by dividing the number 50 by the smaller of the numbers determined using the rules in the IATA Dangerous Goods Regulation Manual.
radactsurfacereading
Enter the radio exposure reading of the package's surface. The reading is in mrem/h.
radactpkglength
Enter the length of the package in metric units.
radactpkgwidth
Enter the width of the package in metric units.
radactpkgheight
Enter the height of the package in metric units.
radactpkgdimunits
Enter the unit of measure used to determine the package's dimensions. This value must be a metric unit of measure.
radactphyform
Enter a description of the physical form of the radioactive substance (liquid, solid, gas, or special).
radactchemformula
Enter the chemical formula of the substance.
Net Explosive Mass
Enter the net mass of the contained explosive substances of a shipment of munitions, fireworks, or similar products without the packaging, casings, bullets, etc, for explosive articles belonging to Class 1. This value can also include the mass of the TNT-equivalent of all contained energetic substances. Required for IATA shipments of explosive materials.
NEM U/M
Unit of Measure for the Net Explosive Mass (see previous row). For DHL Global, the acceptable units of measure are as follows:
-
Deciliters
-
Gallon
-
Grams
-
Kilograms
-
Kilograms Gross
-
Kiloliters
-
Liters
-
Milligrams
-
Milliliters
-
Ounces
-
Pint
-
Pounds
-
Quart
-
Ton
NEM Type
From the drop-down list, select one of the following NEM type to express the net amount of explosive material inside a Class 1 DG commodity. Field is required for class-1 DG commodity.
-
NONE
-
NEW (Net Explosive Weight)
-
NEQ (Net Explosive Quantity)
-
NEM (Net Explosive Mass)
-
NEC (Net Explosive Contents)
NEM Amount
Enter the amount of net explosive mass inside a Class 1 DG commodity, without any casings, etc. The non-numeric, decimal and zero values are not allowed for this field. Field is required for class-1 DG commodity.
DG Qty(High Precision)
Enter the net quantity of the DG commodity, being shipped with higher precision than the existing DG Commodity Quantity. The non-numeric, decimal and zero values are not allowed for this field. Field is required for class-1 DG commodity.
Lithium Battery Type
From the drop-down list, select one of the following Lithium battery types to designate to FedEx the specific type or types of small quantities or low watt hours Section II Lithium Batteries/Cells packed with or contained in the package.
-
Ion Packed with Equipment
-
Ion Contained in Equipment
-
Metal Packed with Equipment
-
Metal Contained in Equipment |
Number Of Containers
Enter the number of occurrences of this container with identical dangerous goods configuration.
Sequence Number
Enter the uniquely identification number to specific hazardous materials commodity.
Click SAVE to save the new box type. Otherwise, click CANCEL to cancel the new box type.
-
Edit a Dangerous Goods Material
-
Click EDIT icon in the left column in the row containing the record that you want to edit.
-
A dialog box appears. Edit the fields as needed.
-
Click SAVE at the bottom of the dialog box to save the changes.
Delete a Dangerous Goods Material
-
Click DELETE icon in the left column in the row containing the record that you want to delete.
-
A confirmation dialog box appears. Click OK to delete the record. Or click CANCEL to keep the record.
Dangerous Goods Packing Types
This screen contains a table of dangerous goods (DG) packing types. You can edit this table to add or delete DG packing types according to the procedures described in the
Conventions
topic. This table contains only a single column and that is the name of the DG packing type.
Note: This table populates the Outer Packing Type drop-down list on the Dangerous Goods Package sub-tab of the Warehouse Options screen with carriers supported for dangerous goods. Parcel populates this table by default with a standard set of dangerous goods packing types.
Configurable Business Rules Module
The Configurable Business Rules Module (CBRM) enables users to create, configure, and manage a variety of business rules with a wide range of complexity for use with shipping systems including Parcel. CBRM reduces the time needed to implement new business rules, enabling users to more efficiently introduce new products, customers, and geographies that require creation of new business rules or updates to existing ones.
CBRM must be installed separately, and then, for Parcel to use the business rules created with CBRM, you must configure Parcel for CBRM using this screen.
Caution: CBRM communicates
with Parcel via the Orchestration Layer (OL). To use CBRM with Parcel, you must first install KOL and configure Parcel with KOL. See the Orchestration Layer (OL) Installation Guide and the section:
Orchestration Layer Integration.
Note: When Parcel See the Configurable Business Rules Module (CBRM) Installation Guide for information about installing CBRM and the CBRM Help for information about how to create business rules.
|
In this box... |
Do this... |
|
Enable Configurable Business Rules Module |
Select (check) this check box to enable Parcel to work with CBRM. |
|
URL |
Enter the URL to access the CBRM Web application. For a transactional URL, set the KOL URL on the Orchestration Layer Integration configuration screen.
|
|
Cache enabled events |
Select this check box to cache events that are enabled for rules in CBRM. (See the CBRM Help on associating a rule with an event.) When this check box is selected, Parcel caches the list of enabled events on startup in order to avoid unnecessary communications with CBRM.
|
Click SAVE to save your CBRM configuration or click CANCEL to leave the screen without saving the configuration.
How Parcel works with CBRM?
When you enable CBRM using this screen and an event is triggered in Parcel (for example, execution of the Ship command), Parcel checks (via KOL) to determine whether any rules configured in CBRM are associated with the SHIP event. If a rule or rules are associated with this event, these rules are then executed.
Caution: on the first
pass, Parcel checks CBRM for associated rules all events. However, if you have selected "Cache enabled events" on this screen, then, on subsequent passes, Parcel only applies rules for events that it originally detected. For example, if, on the first pass, Parcel finds a rule associated with a SHIP event but no rule associated with RATE, then on subsequent passes, Parcel only looks for and applies the SHIP event rule. If a RATE rule has been subsequently added to CBRM, Parcel does not apply this rule. You can reset Parcel to clear the events cache by performing a Refresh operation.
Default Mapping in Parcel of CBRM User Roles
The default Parcel mappings of CBRM user roles is as follows:
|
CBRM Role |
Is Mapped to Parcel Role(s) |
Description of CBRM Role |
|
Reader |
|
Can view all information in CBRM, but cannot change anything (read-only privileges). |
|
Rule Maintainer |
|
Can view and edit all information in CBRM. |
|
Data Maintainer |
Not mapped by default to Parcel role. |
Can view all information in CBRM, but can only edit data elements; for example: geocodes and lanes. |
Notes:
-
These CBRM roles can be configured in the Orchestration Layer config.xml file.
-
For descriptions of Parcel user roles, see the following Help topic: User Management.
Orchestration Layer Integration
The Global Settings are used to control the communications between Parcel and the Orchestration Layer (OL), as well as providing the ability to transmit and receive data from plugin applications via the OL.
Notes:
-
The Orchestration Layer must be installed separately. The information entered on this screen is derived from the OL installation.
-
OL must be installed and the OL integration with Parcel must be activated on this screen to use the Customs Filing Module (CFM) Integration.
In this box...
Do this...
Enable Orchestration Layer Integration
Select (check) this check box to enable Parcel to work with the Orchestration Layer Integration interface.
Orchestration Layer Service URL
Enter the URL for the Orchestration Layer Service or accept the default.
Note: You only need to enter a URL different from the default if the OL is on a different computer from Parcel.Orchestration Layer Service DSN
Enter the Data Source Name (DSN) for the Orchestration Layer Service or accept the default.
Note: You only need to enter a DSN different from the default if the OL is on a different computer from Parcel.Orchestration Layer Service User
Enter the User ID used to authenticate the Orchestration Layer server or accept the default.
Note: The default is the current User ID with administrative privileges used to log in to Parcel. This is the authentication when Parcel is chosen as the Authentication Service Type when installing the OL.Orchestration Layer Service License
Enter the License used to authenticate the Orchestration Layer server or accept the default.
Note: The default is the current password for the User ID with administrative privileges used to log in to Parcel. This is the authentication when Parcel is chosen as the Authentication Service Type when installing the OL. -
Click SAVE to save the changes you entered or click CANCEL to cancel this operation.
Export Integration
The Global Settings are used to control the communications between Parcel and Export, as well as providing the ability to generate Transaction References for shipments that are sent to Export.
|
In this box... |
Do this... |
|
Enable Export Integration |
Select this check box to enable Export integration. This check box is de-selected (cleared) by default. |
|
Parcel WebService URL |
Type the URL for the Parcel WebServices, these are services that included with the Export Integration and are used by Parcel to communicate with Export or accept the default.
|
|
Parcel WebService Host |
Type the Hostname of the Parcel WebService or accept the default.
|
|
Export Request URL |
Type the URL for the Export Server to send requests to or accept the default.
|
|
Export Request Timeout |
Type the timeout for the Export Request Web Service (in seconds) or accept the default. |
|
Parcel Response URL |
Type the URL used by Export to send responses back to Parcel or accept the default.
|
|
Parcel Host Machine |
Type the Hostname for the Parcel Server or accept the default.
|
|
Parcel Port |
Type Port used by Parcel or accept the default.
|
|
Enable Transaction Reference Generation |
Select this check box to allow Parcel to generate sequential Reference numbers for transactions that are sent to Export. This check box is selected by default.
|
|
Optional Reference Prefix |
Type the prefix to be included in the generated reference number. All generated numbers will always start with KX. The maximum length of a Transaction Reference number is 17 characters, therefore this prefix should not be longer than 6 to guarantee a large range of numbers if available. |
|
Reference Sequence Start |
Type the starting number for sequential generation or accept the default of 1. |
|
Reference Sequence End |
Type the ending number for sequential generation or accept the default of 9999999999. |
Click SAVE to save the changes you entered or click CANCEL to cancel this operation.
Multi-Mode Report
Parcel now supports uploading aggregated shipment data to Transport Management System Data Repository (TMSDR) by enabling the configuration of Multi-Mode Report under Global Settings.
-
Parcel aggregates the shipment data by Location (Location ID), Carrier, Service, Mode (Parcel/Parcel LTL) and Ship date.
-
Parcel consolidates USPS services by their class (For example Priority mail, first class mail, Express mail etc).
Configuration of Multi-Mode Report
To configure multi-mode report, follow these steps:
-
From the System menu, select Settings > Locations.
-
Under Global Settings in the Configuration tree in the left-hand pane, click the Multi-Mode Report link.
The Configuration screen is displayed in the right-hand pane. -
Complete the boxes according to the following table.
In this box...
Do this...
Data Export
Select this check box to enable Parcel to upload aggregated shipment data to TMSDR.
Note: This check box is unselected by default.Upload URL
Enter the URL used to connect to TMS.
Username
Enter the Username used to access to TMS.
Password
Enter the Password used to access to TMS.
Upload Task Execution (Cron Expression)
Enter the schedule to upload the aggregated shipment data once per day and time.
Note: The default value for this field is '0 0 5 * * *' i.e., 5 AM.Retry Attempts
Enter the number of retry attempts to upload the aggregated shipment data. If connection to TMS fails till the max retries, then it is uploaded on the next scheduler cycle.
Note: The default value for this field is 3. -
Click SAVE to save the changes.
Parcel App Servers
Use the Parcel App Servers screen in the Global Settings section to add, edit, view, search or delete the Parcel Servers to improve the redundancy and to support high availability for the cloud parcel environment.
Note:
-
The Parcel Server is a unique for a Parcel Web Host.
Add a Parcel App Servers
-
Click the ADD icon at the top of the screen. The Add Record dialog box appears.
-
Complete the boxes as follows:
In this box...
Do this...
Parcel Server
Enter a unique Parcel Sever Name. (i.e., Machine Name)
For Example: localhost or IP Address (xx.xx.xxx.xxx)Parcel Web Host
Enter a unique Parcel Web Host. (i.e., URL)
For Example: https://localhost
Output Directory
Enter the Output Directory. For Example: C:\Program Files (x86)\Kewill\ArtifactsAndLogs\Flagship\WebGUI\output.
CBRM Server Host
Enter a unique Parcel CBRM Server Host. (i.e., URL)
For Example: https://localhost:8103/URMGui/UI.htmlOL Server Host
Enter a unique Parcel OL Server Host. (i.e., URL)
For Example: http://localhost:8101/KOL.svcRegistered Serial Number
User receives Registered Serial Number after completing the registration process.
Registered System Type
User receives Registered System Type after completing the registration process.
-
Click SAVE to save the new box type. Otherwise, click CANCEL to cancel the new box type.
Edit a Parcel App Servers
-
Click EDIT icon in the left column in the row containing the record that you want to edit.
-
A dialog box appears. Edit the fields as needed.
-
Click SAVE at the bottom of the dialog box to save the changes.
View a Parcel App Servers
-
Click VIEW icon in the left column in the row containing the record that you want to view.
-
A dialog box appears. You can view the selected record details.
-
Click CLOSE at the bottom of the dialog box to close the record.
Search a Parcel App Servers
-
Click SEARCH icon at the top of the screen. A small dialog box appears.
-
In the drop down list on the dialog box, select the field that you want to search.
-
Enter the text that you want to search for in that field.
-
Click SEARCH icon to search for the record.
The system searches for records that match your criteria and return those matching records.
Delete a Parcel App Servers
-
Click DELETE icon in the left column in the row containing the record that you want to delete.
-
A confirmation dialog box appears. Click OK to delete the record. Or click CANCEL to keep the record.
Settings
Use the Settings screen in the Global Settings section to configure Parcel components, including DI Server and database connection. The settings specified here are non-DC specific.
Add a Record
-
Click ADD icon at the top of the screen. The Add Record dialog box appears.
-
Complete the boxes as follows:
In this box...
Do this...
machine_name
Type the machine name, if setting is server specific.
Domain
Type the top level logical component name.
Sub Domain
Type the second level logical component name.
Key Name
Type the name of the key value pair.
Key Value
Type the value associated with Key Name.
Display Name
Type the description of the key specified above.
-
Click SAVE to save the record details entered. Otherwise, click CANCEL to cancel this operation.
Edit a Non-DC specific Setting
-
Click EDIT icon in the left column in the row containing the record that you want to edit.
-
A dialog box appears. Edit the fields as needed.
-
Click SAVE at the bottom of the dialog box to save the changes.
Delete a Non-DC specific Setting
-
Click DELETE icon in the left column in the row containing the record that you want to delete.
-
A confirmation dialog box appears. Click OK to delete the record. Or click CANCEL to keep the record.
Authentication Settings for Pipe delimited API
Parcel now supports pipe delimited API Authentication by default.
A new user account (system_api_user) is created for authenticating internal API calls, like transactions between Scheduler, IAServer and DIServer.
Updating the default password for new user account (system_api_user)
In 'User Accounts' Section
To update default password for 'system_api_user' user in 'User Accounts' section, follow the below steps:
-
Navigate to System > User Accounts > Users.
-
Search for User Name with 'system_api_user'.
-
Click VIEW.
-
Update *Password* and *Confirm Password* for 'system_api_user' user and then click UPDATE, as shown in following screen.

Also, update default password for new user account (system_api_user) in Settings.
In 'Settings' Section
To update default password for 'system_api_user' user in 'Settings' section, follow the below steps:
-
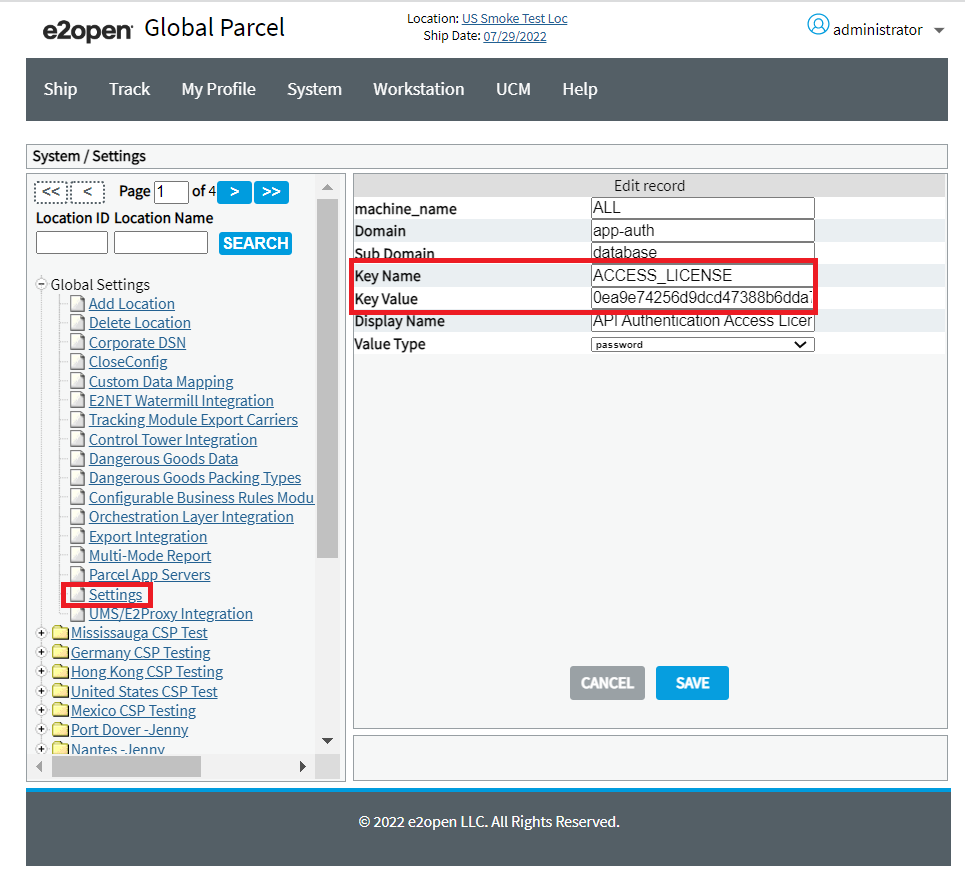
Navigate to System > Settings > Locations > Global Settings > Settings.
-
Search for Key Name with ACCESS_LICENSE and enter MD5 Hash Encrypted Password in the Key Value field, as shown in following screen.
Note: To get MD5 Hash Encrypted Password, you can use below URL or any other site that uses MD5 Algorithm.
https://www.md5hashgenerator.com/
-
Click SAVE to save the settings.
Replace default user account for internal API transactions
Instead of using default user account 'system_api_user', users can configure his own account, as described in following steps:
-
Navigate to System > Settings > Locations > Global Settings > Settings.
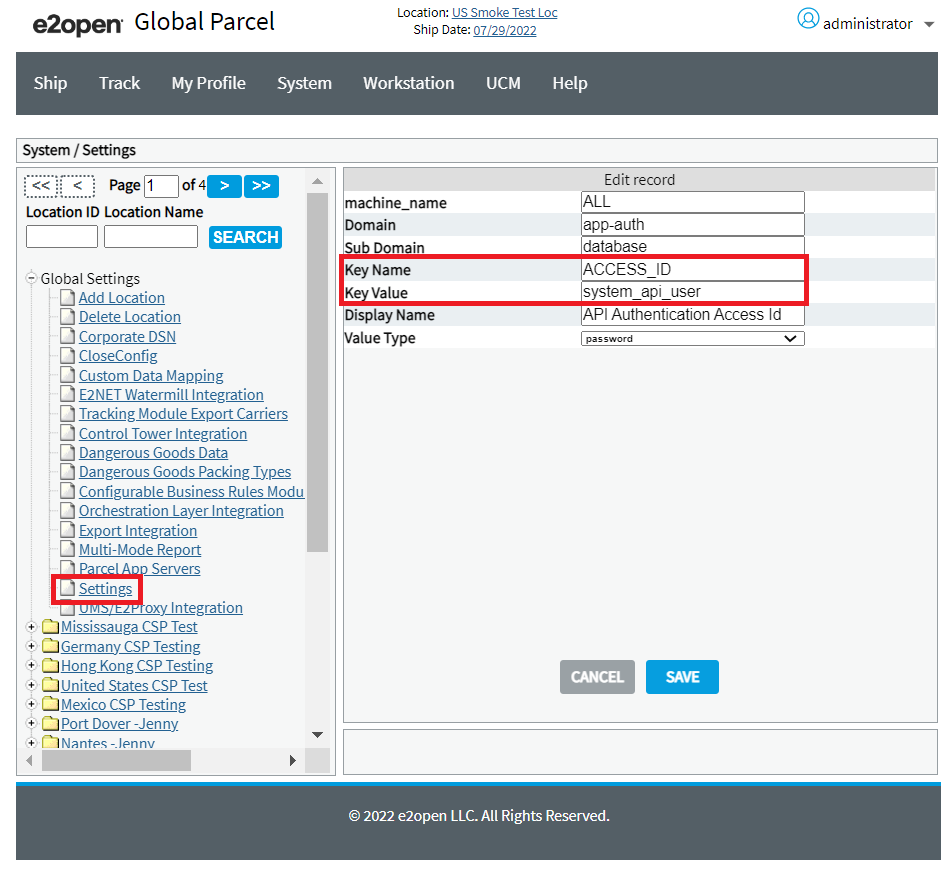
Note: Users should use a user account that already exists in the application to replace for ACCESS_ID and ACCESS_LICENSE. -
Search for Key Name with ACCESS_ID and enter the Username in the Key Value field, as shown in following screen.
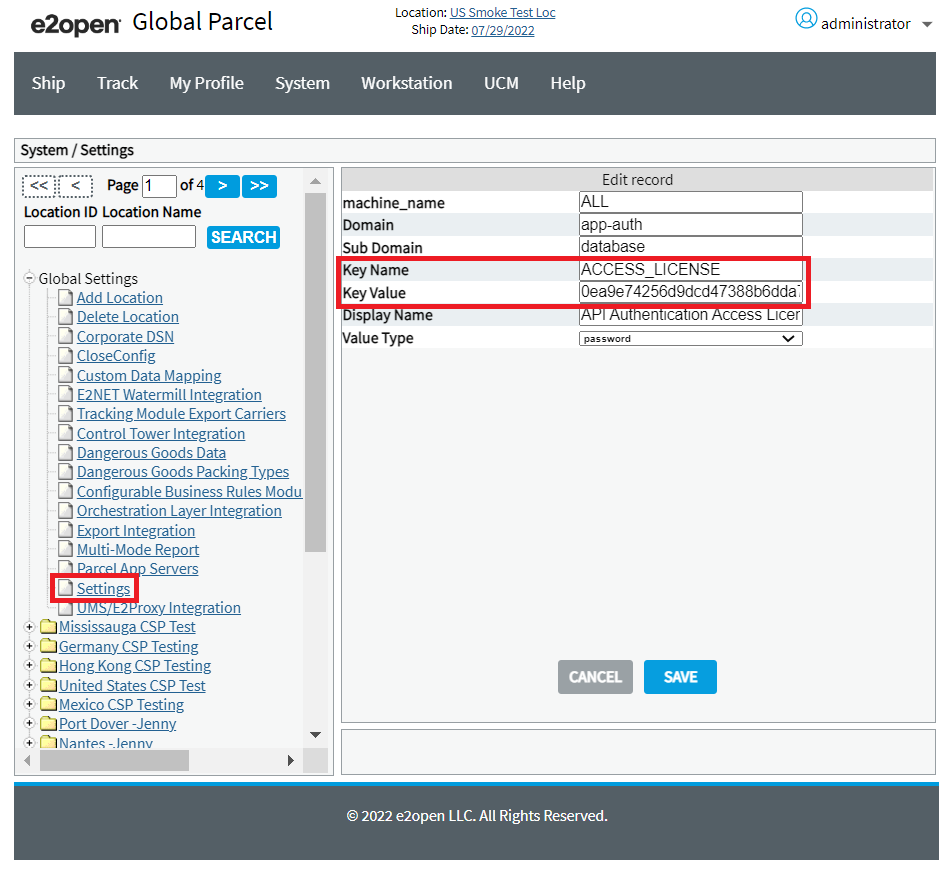
-
Search for Key Name with ACCESS_LICENSE and enter MD5 Hash Encrypted Password in the Key Value field, as shown in following screen.
-
Click SAVE to save the settings.
Disabling API Authentication
To disable API Authentication, follow these steps:
-
Navigate to System > Settings > Locations > Global Settings > Settings.
-
Search for Key Name with EnableAPIAuthentication and set the Key Value to 'F' as show in the following screen.
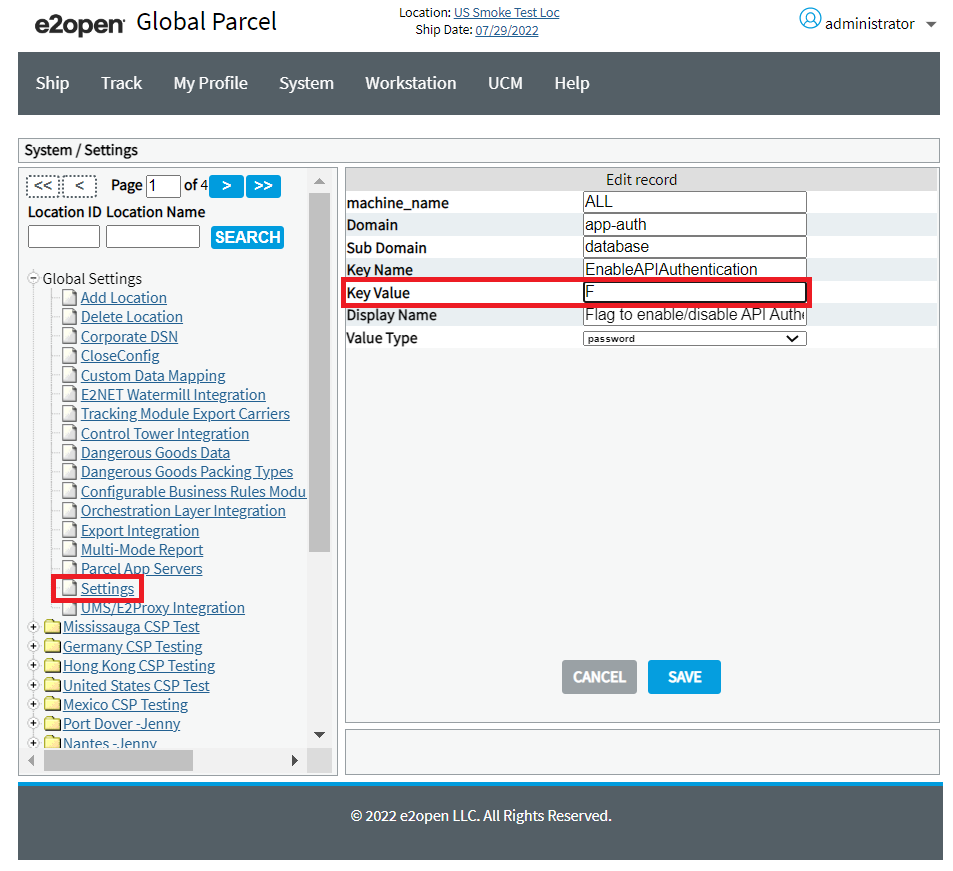
The Key Name = EnableAPIAuthentication specifies the Enable/Disable of API Authentication. Options are:
T = Perform API Authentication.
F = Perform no API Authentication. -
Click SAVE to save the settings.
UMS/E2Proxy Integration
Parcel now supports integration with the E2Proxy application by enabling the configuration of a E2Proxy Integration under Global Settings. This integration is for user data authentication.
Parcel also supports integration with the User Management Service (UMS) application by enabling the configuration of a UMS Integration under Global Settings. This integration allows the user administrators to manage access to e2open applications regardless of whether the applications are shared multi-tenant or private deployments for managing the user management data.
Note:
-
The UMS/E2Proxy Integration is for a Hosted deployment.
Configuration of UMS/E2Proxy Integration
To configure UMS/E2Proxy Integration, follow these steps:
-
From the System menu, select Settings > Locations.
-
Under Global Settings in the Configuration tree in the left-hand pane, click the UMS/E2Proxy Integration link.
The Configuration screen is displayed in the right-hand pane. -
Complete the boxes according to the following table.
In this box...
Do this...
UMS Integration
Select this check box to enable UMS integration. This check box is unselected by default.
Note: When this check box is selected, the Users sub-menu under System > User Accounts disappears.E2Proxy Integration
Select this check box to enable E2Proxy integration. This check box is unselected by default.
UMS IVR User
Accept the default. This field is auto-populated with random number on selecting UMS Integration check box. This is a read-only field and cannot be edited.
-
Click SAVE to save the changes.
After Parcel is successfully integrated with E2Proxy Application, then E2Proxy sends the user details (such as: key and value. For Example: Key:iv-user and value:administrator) in the HTTP Header. Parcel validates the user details with Parcel DB and creates a user session.