Canada Post
Overview
The Canada Post module in Parcel lets you:
-
Use Canada Post customer-specific rates.
-
Print Canada Post compliant manifests.
-
Print Canada Post compliant labels.
-
Generate and upload an electronic end-of-day file to Canada Post.
Note: Parcel does not support consolidated rating or COD deliveries for a Canada Post carrier.
Recent Updates - Canada Post 2022
Rate Updates
Parcel supports the following Rates changes for Canada Post, effective from September 12, 2022. The changes are as follows:
-
Domestic Services
-
Priority
-
Xpresspost
-
Expedited Parcel
-
Regular Parcel
-
-
Compliance Changes:
-
Signature Charges hiked from $1.75 to $2.00.
-
Liability Coverage (up to $100) for Regular Parcel hiked from $2.25 to $2.50
-
Additional Liability Coverage hiked from from $2.25 to $2.50.
-
-
Peak Period Surcharge
-
Updated the Canada Post Peak Period Surcharge, effective from October 31, 2022, to January 15, 2023, for Oversize and Unpackaged Surcharges.
-
The Oversize and Unpackaged Surcharges hiked to $25.
-
Previous Updates - Canada Change 2022
Effective from July 4, 2022,
-
When you enter a recipient name in the Attention To field, the recipient's name will be included in the D48 manifest file.
-
The label indicator Do not Safe Drop – French Translation is corrected. This is supported through API.
Rate Updates
Parcel supports the following Rates changes for Canada Post, effective from January 10, 2022 for Levels 0 to 3.
-
Domestic Services
-
Priority
-
Xpresspost
-
Expedited Parcel
-
Regular Parcel
-
Special Services/Accessories
-
The Oversize Surcharge increase to $18. This surcharge applies to items where the longest of the item is greater than 100cm/39.4 in and/or where the second longest side is greater than 76 cm/30 in.
-
The Unpackaged Surcharge increase to $18. This surcharge applies to items that are not packaged. For Example: tires.
Peak Period Surcharges
-
Parcel has updated the Canada Post Peak Period Surcharge, effective from November 1, 2021 to January 16, 2022 for Oversize and Unpackaged Surcharges.
-
The Oversize and Unpackaged Surcharges increase to $25.
Postal Code
• New L3J Postal Code is added, effective from March 21, 2022.
Previous Updates - Canada Post Rate Change 2021
Rate Updates
Parcel supports the following Rates changes for Canada Post, effective from September 13, 2021 for Levels 4 to 15.
-
Domestic Services
-
Priority
-
Xpresspost
-
Expedited Parcel
-
Regular Parcel
-
Special Services/Accessories
-
The Oversize Surcharge increase to $18. This surcharge applies to items where the longest of the item is greater than 100cm/39.4 in and/or where the second longest side is greater than 76 cm/30 in.
-
The Unpackaged Surcharge increase to $18. This surcharge applies to items that are not packaged. For Example: tires.
Postal Codes
-
New R6P and R6T Postal Codes are added.
Peak Period Surcharges
-
Parcel has updated the Canada Post Peak Period Surcharge, effective from November 1, 2021 to January 16, 2022 for Oversize and Unpackaged Surcharges.
-
The Oversize and Unpackaged Surcharges increase to $25.
Previous Updates - Canada Post Rate Change 2021
Parcel supports the following Rates and Compliances changes for Canada Post effective from January 11, 2021.
-
Domestic Services
-
Priority
-
Xpresspost
-
Expedited Parcel
-
Regular Parcel
-
Special Services/Accessories
-
Oversize Surcharge increase to $15 from $12.
Previous Updates
-
Added a new Unpackaged Surcharge of $12.
Previous Updates
-
New Postal Codes starting with R5L, R5M, R5N, R5P, R5R and R5T are added.
-
Supports Close and Upload for multiple Canada Post shipments that belong to a specific location and generates the manifest number for all the closed shipments.
For Example:
Location –
Toronto
,
Configuration two
Canada Post Carriers - CAPO-1 and CAPO-2,
Shipments
– Create the
Shipment1
and Shipment2 from CAPO-1
and Shipment
3 from CAPO-2.
If you close one of the shipment (say Shipment
3
) then Shipment
3
gets closed, as they belong to CAPO-
2
carrier and generate the Manifest Number to the closed shipment. But, Shipment
1 and Shipment2
will not get closed, since it belongs to CAPO-
1
carrier.
Previous Updates: Canada Post Rate and Compliance Patches
The following are the new Rates and Compliance Changes (2019) for Canada Post are effective from January 14, 2019. For more information, see the Canada Post Overview of Changes Web page
Rate and Rate Code Updates
-
Generic Rates (45 rate zones) have been updated.
-
Zone to Rate Code changes:
-
Rate Code from originating zone L01 to destination zones T22, T60, T71, V70, & V72 has been changed from H4 to H3.
-
Rate Code from originating zones X99 and Y99 has been changed from J2 to J1.
-
For Yukon, Northwest Territories, and Nunavut: Rate Codes from originating zones X01, X70, Y01, & Y70 has been changed from G1, H1, H3, and H5 to H4 or J1.
Manifest Changes
Effective from April 01, 2019, the Manifest file format is updated with the following changes to meet the requirement from the elink manifest data file specification document.
-
Header Record is now replaced with File Record.
-
New Details Record and Scale Weight fields are now added.
Airport Codes
Canada Post has introduced three-digit Airport Codes for Priority™ and Xpresspost™ items that are transported by air. This three-digit airport code now appears in the top left hand corner of the shipping label.
Note: The Airport Code is the code for the last airport before delivery. See the CAPO Web site for a list of these codes.
• Effective from April 03, 2018, the Airport Codes for A0R and A2V has been changed from YWK to YYR.
Postal Codes
• New R5J and R5K Postal Codes are added, effective from June 18, 2018.
• New V8E Postal Code is added, effective from September 17, 2018.
-
New Postal Codes starting with T3T, T6Y and L3L are added.
Cubing Factor
The cubed weight (dimensional rating) for an item is calculated as follows: Minimum Density Weight = (Length x Width x Height)/Constant Minimum Density Factor. Effective January 12, 2015, CAPO is changing the Constant Minimum Density factor for the following CAPO Domestic services from 6,000 to 5,000 for metric units and from 166 to 139 for Imperial units. (Note that only the Canada domestic services that Parcel supports are listed.)
• Priority™
• Xpresspost
Effective from January 15, 2018, CAPO is changing the Constant Minimum Density Factor for the Expedited Parcel Service from 6,000 to 5,000 for metric units and from 166 to 139 for Imperial units.
Note: The Density Factor for Regular Parcel Service will remains at 6,000.
Air Stage
The Air Stage listing has been updated for 2018.
Supported Services
See the following Help topics for information about using Supported Services of CAPO in Parcel: Supported Services.
Options/Special Services
Not Applicable.
Billing Types
Parcel supports the following billing types for Canada Post: Prepaid
Forms and Reports
After you close Canada Post, you can print reports to accompany the shipments when the Canada Post driver arrives to pick up the shipments. Use the Reports page on the Ship menu to print reports.
The following table lists the reports that are available to print for Canada Post.
|
Report |
Description |
|
Electronic Remittance Form |
Plain paper format
|
|
Summary Manifest |
Printed after closing Canada Post. Can be generated for all services or for single services as selected in the user interface. |
Labels
Label stock is 4x6 inches - thermal.
Packaging Types
The following package types are available with all services:
|
Service |
Description |
|
Parcel |
Maximum weight: 30 Kg/66 lbs
|
|
Packet |
Maximum weight: 1.36 Kg/3 lbs
|
|
Unpackaged |
Unpackaged items are the items that are not packaged. For Example: tires.
|
Note: You can not process multi-package shipments using Canada Post. Each Canada Post shipment can contain only one package.
Supported Origins and Destinations
Canada Post provides parcel delivery domestically within Canada.
Origins Supported
Canada Post provides parcel delivery domestically within Canada.
Supported Printers
Parcel supports the following printers with Canada Post:
-
Zebra (thermal)
-
Datamax
-
PNG (laser)
Note: Parcel supports only models of the printers listed above that provide a 203 dpi resolution.
Package Types
The following package types are available with all services:
|
Service |
Description |
|
Parcel |
Maximum weight: 30 Kg/66 lbs
|
|
Packet |
Maximum weight: 1.36 Kg/3 lbs
|
Notes: You can not process multi-package shipments using Canada Post. Each Canada Post shipment can contain only one package.
Upload
Electronic upload for Canada Post is by FTP.
See the following Help topics for information about using Canada Post in Parcel:
-
Supported Services
-
Configuration
-
Custom Management Tool Guide
-
Reference Fields
-
Reports
Supported Service
The following Canada Post services and Special Services are supported:
-
Domestic Services
-
Accessorials
Domestic Services
|
Service |
Code |
Description |
|
XpressPost |
XPP |
Delivery by the end of the next day if local, up to days elsewhere. |
|
Expedited Parcel |
EXPP |
Delivery within one to seven days. |
|
Priority |
PRI |
The quickest delivery - usually by noon the next day.
|
|
Regular Parcel |
REGP |
Delivery within two to nine days. |
Accessorials
Most of these services can be selected in the *Options* dialog box (while processing a package on the Warehouse page, click \[OPTIONS\] on the Parcel tab).
Important Note: Effective from January 16, 2017, if the Declared Value for a Canada Post shipment equals or exceeds $200, a signature is required. On the Parcel Warehouse Options screen under Special Services, the check box for this requirement is mandatory. Parcel validates this requirement. Note that the Priority™ service includes the Signature option as part of this service; however, if additional liability is purchased for a shipment with a value of $200.00 or greater, the user must still select the signature option.
|
Service |
Description (see ups.com for details) |
|
Additional Coverage |
Enter the value of the package contents for insurance purposes. The maximum declared value protection that Canada Post provides is $5,000.00. The first $100.00 in value is free (this is the Coverage accessorial) unless it is a Regular Parcel without COD service, then the first $100 in value incurs a small fee.
While processing a package on the Warehouse page, click OPTIONS, then enter the Declared Value amount on the Shipment tab. |
|
Additional Handling |
For packages that require additional handling. To select Additional Handling while processing a package on the Warehouse page, click \[OPTIONS\], then select the *Additional Handling* check box on the Shipment tab. |
|
Bill Shipper |
The carrier bills shipping charges to the shipper.
|
|
Coverage |
Enter the value of the package contents for insurance purposes. The first $100.00 in value is free (unless it is a Regular Parcel without COD service, then the first $100 in value incurs a small fee). The Additional Coverage accessorial is for any value over $100.00 and up to the maximum of $5,000. While processing a package on the Warehouse page, click OPTIONS, then enter the Declared Value amount on the Shipment tab. |
|
Delivery Confirmation |
Positive confirmation that an item arrived at its destination. Upon delivery, the item ID is scanned and the date is captured. This information is available by noon on the next business day.
While processing a package on the Warehouse page, click \[OPTIONS\], then select the More Shipment tab. In the Delivery Confirmation list, select Delivery Confirmation. |
|
Dimensional Weight |
Use the Dimensions (LxWxH) fields on the Parcel tab on the Warehouse page to enter the length, width, and height for all packages. |
|
E-Mail Notification |
E-mail notification about the status of the shipment. You can specify an e-mail address to which to send an e-mail when the shipment is delivery, delayed, or sent. While processing a package on the Warehouse page, click \[OPTIONS\], then enter the e-mail address in the E-mail on Delivery, Delay, or Sent fields. |
|
Oversize |
For parcel packaging type only - the fee for any parcel that exceeds 1 meter in any dimension. No single dimension can exceed 2 meters. Length plus girth cannot exceed 3 meters.
|
|
Residential Delivery |
Delivery to a residence including a business operating out of a residence that does not have an entrance open to the public.
|
|
Saturday Pickup |
For pick-up of a shipment on a Saturday. To select Saturday Pickup while processing a package on the Warehouse page, click \[OPTIONS\], then select the Saturday Pickup check box on the Shipment tab. The ship date must be a Saturday. |
|
Signature Required |
Provides automatic confirmation with a printed copy of the recipient's digital signature. While processing a package on the Warehouse page, click OPTIONS, then select the More Shipment tab. In the Delivery Confirmation list, select Signature Confirmation. If Proof of Age is required, select Adult Signature Required.
|
|
Sunday Pickup |
For pick-up of a shipment on a Sunday. To select Sunday Pickup while processing a package on the Warehouse page, click OPTIONS, then select the Sunday Pickup check box on the Shipment tab. The ship date must be a Saturday. |
Configuration
To configure Canada Post so that you can use it to ship packages in Parcel, you must follow these steps:
-
Add a shipper account to the Canada Post Customer Management Tool (CMT). See this help topic: Canada Post - Customer Management Tool Guide.
Note: The Canada Post CMT is not currently available in French.
-
Complete all of the configuration screens for Canada Post in the Parcel Configuration Tool .
Customer Management Tool Guide
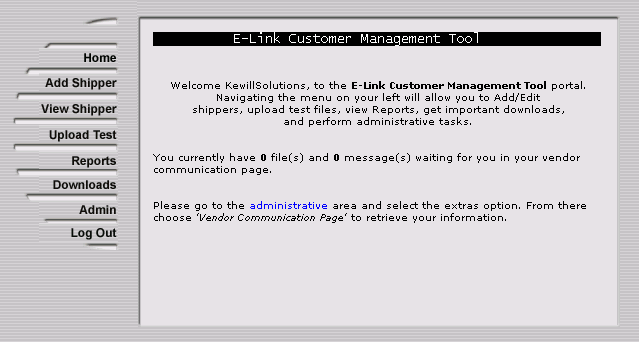
Before you can configure Canada Post in the Parcel Configuration Tool, there are steps that you must complete the required information in Canada Post's E-Link Customer Management Tool (CMT). These steps are outlined below:
You can access the CMT at the following URL:
{+}
https://www.cpclink.ca/+ ![]()
Note: Before attempting to long on to the Canada Post Customer Management Tool, contact Canada Post with your Customer Number and request login information (User Name and Password) from you Canada Post Representative. Add Shipper
This option is used when you have a new customer. By adding a shipper, you are creating a customer profile.
Step 1: Select Add Shipper from the list of options on the left hand side.
Step 2: You are required to complete the following sections:
-
Shipper Information – Include the customer's mailing information. For USA address, change "Province" to first option which is null. Enter Zip Code in "Postal Code" field and change "Country" to "USA".
-
Setup Information – The "File Type" should indicate "ASCII Flat File", "Connection Type" should indicate "FTP". You are not required to complete any other fields in this section.
-
Shipper Contact Information – Please include a customer contact including name, email address and phone number.
-
Shipper Requests for CanadaPost – The text that is included in this section will be included in a generated email that will be provided to Canada Post. This generated email advises Canada Post that a shipper has been added. It is Canada Post's responsibility to add the shipper's Customer/Contract information (from the Details page). If you have the Customer Number and/or Contract Number, you may provide it in this section.
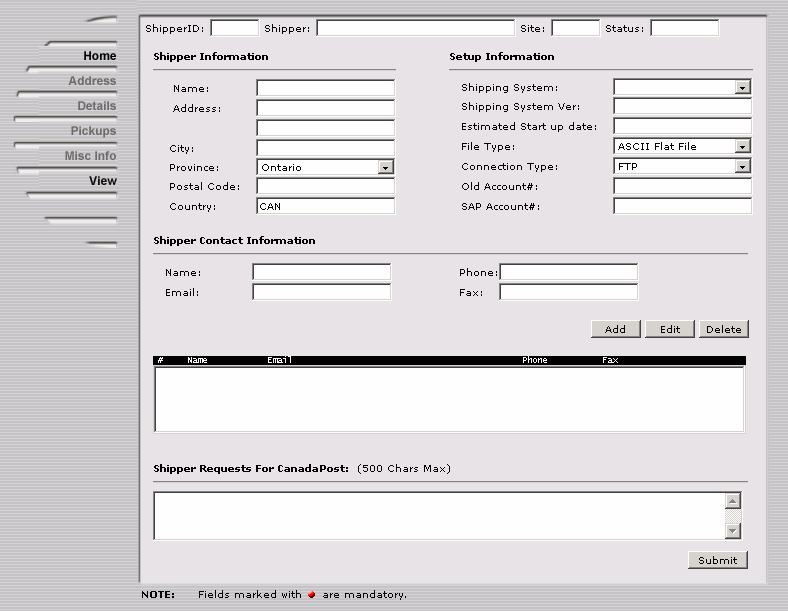
Step 3: Once you have entered the information, click on Submit.
Once you have submitted the data, a Site ID will be generated and will be displayed on at the top of the page. This Site ID will be used in the eLink file (field 4). It is also used to generate the Manifest Number.
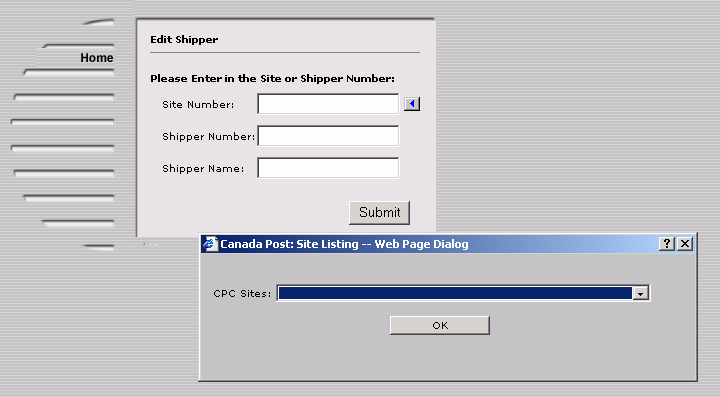
View Shipper
This option can be used to view and/or edit an existing customer's profile.
Step 1: Select View Shipper from the list of options on the left hand side.
Step 2: Once you have shippers added, you can click on the arrow. This will bring up a dialog box. You will be able to select from your list of shippers by clicking on the down arrow. By clicking Submit, the customer's Address page will then be displayed.
Upload Test
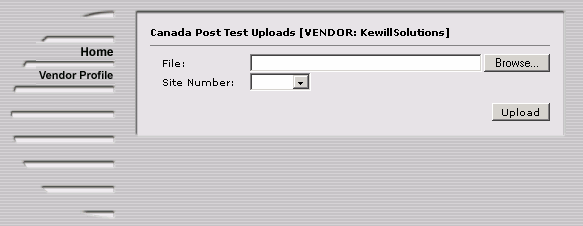
This option is used to test an eLink file.
Step 1: Select Upload Test from the list of options on the left hand side.
Step 2: Click Browse to select the file to be tested and then click Upload.
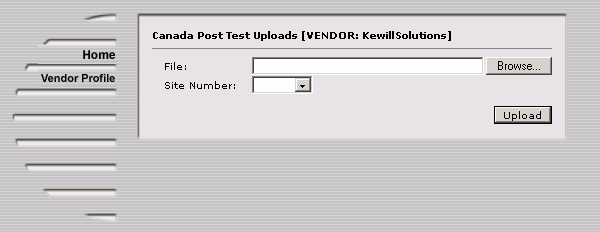
Step 3: You should then receive the following message - 'Upload successful!'. Click on "Return", this will bring you back to the main page.

View Test Results
Step 1: In order to view the results, from the main page, click Upload Test.
Step 2: Click Vendor Profile.
Step 3: Scroll down, and you should find the test results. If the file does not appear, click Refresh Listing.
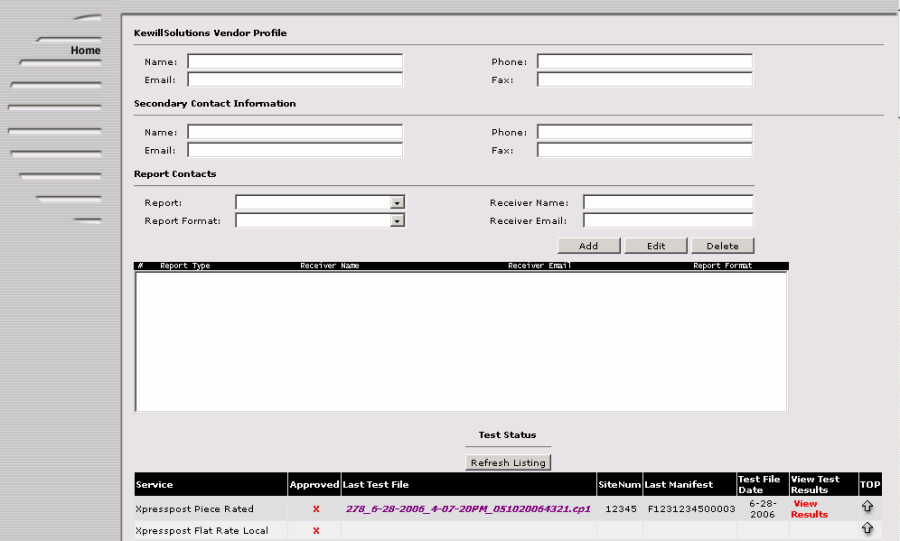
The results are displayed by service type. If the file contains multiple Article Numbers (services), the file will be displayed under the service representing the first item in the file.
You can then view the results.
If "View Results" appears in blue, this indicates that the file does not contain any errors. If "View Results" appears in red, this indicates that there are errors within the file.
![]()
Step 4: Click View Results, a page then opens displaying the data. If there is an error, it will be highlighted in red. Note that this tool stops on the first error. You will be required to fix the file and resubmit it.
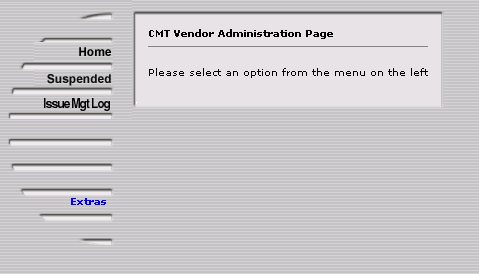
Admin
This option provides multiple functionalists. The two options to note are the "Suspended Files" and "Extras" which allows you to add, edit and remove user accounts (CMT access).
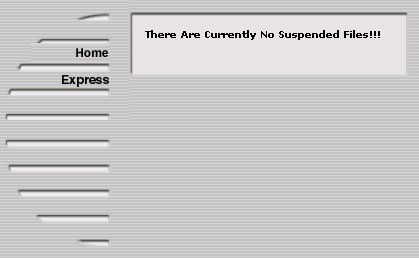
Suspended Files
When a customer transmits a file containing errors that Comport cannot correct, the file suspends. It is your responsibility as the Vendor to correct the errors and resubmit the file. You can locate the suspended file and view the error message using the CMT.
Step 1: Select Admin from the list of options on the left hand side.
Step 2: Select Suspended from the list of options on the left hand side.
Step 3: The suspended file would appear in the next screen.For Commercial Expedited Parcel USA, the suspended file would be located on the "Express" page.
Extras
This option contains multiple functionalists.
Step 1: Select Admin from the list of options on the left hand side.
Step 2: Select Extras from the list of options on the left hand side. This will bring up a dialog box containing multiple options.
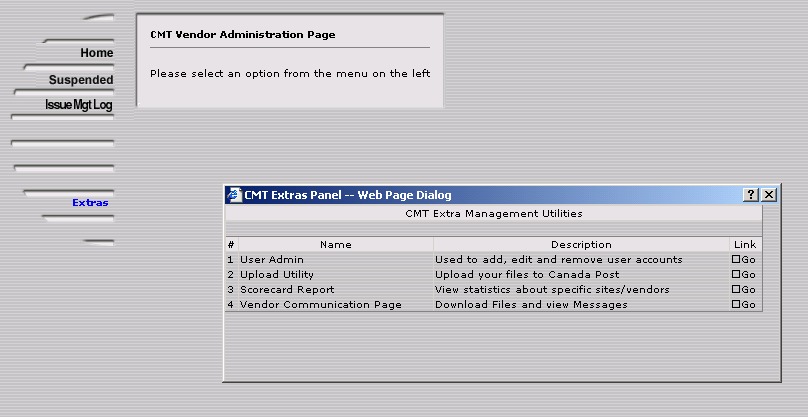
User Admin
This option allows you to manage your CMT access. You can add, edit and remove user accounts.
Step 1: Select option 1, User Admin from the dialog box.
Step 2: Edit the fields as required, then click Save.
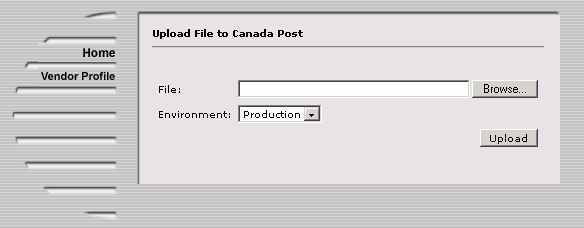
Upload Utility
This option allows you to upload files to Canada Post (for example, resubmitting suspended files).
Step 1: Select option 2, Upload Utility from the dialog box.
Step 2: Click Browse to select the file to be uploaded and then click Upload.
Reference Fields
You can use reference fields to include reference information (such as purchase order number) for each shipment in the Canada Post upload file. The following table lists the reference fields that are available in the Canada Post module.
|
Ref Field |
Shipment/Pkg Level |
On Label? |
In Upload? |
Length |
SOR Field |
UI Field |
|
REFERENCE2 |
Shipment |
No |
Yes |
30 |
ponum |
PO Number |
|
ORDER_NUMBER |
Shipment |
No |
Yes |
30 |
flex8 |
N/A |
|
REFERENCE3 |
Shipment |
No |
Yes |
30 |
licplatenum |
Number 1 / Type 1 |
Reports
After you close Canada Post, you can print reports to accompany the shipments when the Canada Post driver arrives to pick up the shipments. Use the Reports page on the Ship menu to print reports.
The following table lists the reports that are available to print for Canada Post.
|
Report |
Description |
|
Electronic Remittance Form |
Plain paper format
|
|
Summary Manifest |
Printed after closing Canada Post. Can be generated for all services or for single services as selected in the user interface. |
Single Account Number for Multiple Location IDs
Parcel allows shippers to use the same shipper account to ship from multiple shipping locations.
For Example:
-
Instance-1- Location – Canada, Carrier – Canada Post, Account Number – 1234590, Domestic Code – CAPO11.
-
Instance-2- Location – Canada, Carrier – Canada Post, Account Number – 1234590, Domestic Code – CAPO22.