Main Steps
To process a shipment from the Warehouse screen, you must complete the Receiver, Sender, and Parcel tabs and, optionally, other tabs on this screen.
Tabs on the Warehouse screen
The Warehouse screen consists of the following tabs containing forms with required fields that must be filled out in order to process a shipment:
On the left-hand panel:
-
Sender tab (see table in step 4 of the following procedure)
-
Receiver tab (see table in step 3 of the following procedure)
On the right-hand panel:
-
Parcel tab (see table in step 7 of the following procedure)
In addition, the following optional tabs are available if additional information is required:
On the left-hand panel:
On the right-hand panel:
To process a shipment, do the following:
-
If the main shipping screen is not already displayed, click the Ship menu and select Warehouse.
The Warehouse screen opens with the Receiver tab displayed in the left panel (see step 3). -
To change Location or Ship Date, click the hyperlinks at the top of the page as follows:
In this box...
Do this...
Location
From the list, select the location from which you are processing the shipment. The location configured in your Preferences appears by default.
Ship Date
If the shipment will not be picked up until tomorrow or if you are future-shipping the shipment, click the ship date hyperlink and select the future date from the popup calendar. Parcel displays today's date by default.
-
On the Receiver tab, supply the address of the receiver of the shipment in the following sub-tabs:
Receiver Details TabIn this box...
Do this...
Shipment Number
If you want to retrieve a shipment from a database, click search to select the shipment number or type a shipment number in the box.
Note: If you leave this field blank, Parcel automatically assigns a unique shipment number when you click Ship.
Customer Code
If you use a customer database, click search to select a customer record from one of the Address Books or type the customer code and press the Tab key. When you press the Tab key after specifying the customer code, the search is performed in the address books in a specific order.
To enter a new customer that you want to save to the customer database, click icon and add the customer to the Personal, Global, or Mailing address book.
Note: When you click the icon with the Customer Code field blank, the Address Book opens in a separate window. To populate the Receiver fields with existing customer information, search for and select the appropriate customer address in the Address Book window, and then click DONE. For more information, see the Help topic: Using the Address Book. To enter customer data manually, refer to the following rows of this table.
Address Type
From the list, select the address type of the customer.
Country
(required field)From the list, select the country where the customer resides.
Company/Name
Type the company name of the customer.
Attention To
Type the customer's name.
Address 1
(required field)Type the customer's street address.
Address 2
Type any additional address information such as apartment number or floor.
Address 3
Type any additional address information such as apartment number or floor.
City
(required field)Type the customer's city.
State/Province
(required field)From the list, select the customer's state or province if shipping to the United States, Puerto Rico, Canada, Mexico, and Australia.
Postal Code/ZIP
(required field)Type the customer's postal code.
Phone/Ext
Type the customer's phone number. This is required for international shipments and may be required for other types of shipments as well, depending on carrier requirements.
Fax Number
Type the customer's Fax number.
E-mail
Type the customer's e-mail address if available.
Address
Residential: If the customer's address is a residence, select the Residential check box.
Validate: If you want to validate the address, select the Validate check box/ click the Validate hyperlink. The application also validates that if you are shipping to a P.O. Box that the carrier you select delivers to P.O. Boxes. Suggestions are provided to enable you to input valid values, and error messages warn you of invalid values.
Add/Update To Address Book
This check box works as follows:
-
If you do not populate the fields on the Receiver tab from the Address Book (using the Customer Code field) and are entering new address information, the Add To Address Book field appears at the bottom of the Receiver tab. Use this field to add the address information you entered to the Address Book as follows:
-
Select (check) the Add To Address Book check box.
-
From the drop-down list, select Personal (the default) or Global, depending on whether you wish to add the information to your Personal Address Book or to the Global Address Book.
When you perform the shipping operation, Parcel automatically adds the address information on the Receiver tab to the specified Address Book.
If you populate the address fields on the Receiver tab from the Address Book using the Customer Code field, the Update To Address Book field appears at the bottom of the Receiver tab. Use this field to update the existing address information in the Address Book as follows:
-
Edit the address information on the Receiver tab.
-
Select (check) the Update To Address Book check box. Note that the drop-down list is deactivated (grayed out). The address information is updated in the Address Book from which the fields on the Receiver tab were populated.
When you perform the shipping operation, Parcel automatically updates the Address Book with the address information on the Receiver tab.
Government Id TabIn this box...
Do this...
Registration Number Type
From the list, select the Registration Number Type of the Receiver.
-
Passport ID
-
Resident ID
-
Company ID
-
Employer Identification Number
-
DUNS Number
-
BUSINESS_NATIONAL
-
BUSINESS_STATE
-
BUSINESS_UNION
-
PERSONAL_NATIONAL
-
PERSONAL_STATE
-
EORI Number
-
VAT Registration
-
Free Trade Zone
-
Social Security Number
-
Data Universal Numbering System
-
Federal Tax ID
-
State Tax ID
-
Brazil CNPJ/CPF Federal Tax
-
Overseas Registered Supplier
-
AUSid GST Registration
-
Import One-Stop-Shop
-
VAT on E-Commerce
-
Her Majesty's Revenue and Customs
-
Deferment Account Duties, Taxes and Fees Only
-
Deferment Account Tax Only
-
Deferment Account Duties Only
-
Postponed VAT Accounting (PVA)
For Examples:
-
In the US it can be a DUNS Number, a Social Security Number, or a Government assigned Exporters ID Number (EIN). In Canada it is referred to as the Tax ID Number.
-
In the UK it can be a EORI (Economic Operator Registration & Identification) Number. In UK for DPD Carrier it is referred as the Tax ID Number.
Note: User can enter maximum up to 10 Registration Number Type for each shipment.
Registration Number
Type the Registration Number of the Receiver, which is selected from Registration Number Type drop-down field.
Registration Issuer Country
From the list, select the Registration Issuer Country of the Receiver.
Note: If user enters at least one field in the Government Id sub-tab, then remaining fields are mandatory and vice versa for DHL carrier.
Use the buttons at the bottom of the Government Id tab as follows:Click this button...
To...
ADD
Add the Government Id details of the Receiver to the grid.
EDIT
Edit the required Government Id details of the Receiver in the grid. Select the check box next to the Government Id details of the Receiver in the grid that you want to edit and click [EDIT]. After you have completed editing the Government Id details of the Receiver, click [SAVE].
CLEAR
Clear the data you entered in the fields.
DELETE
Delete the Government Id details of the Receiver from the grid. Select the check box next to the Government Id details of the Receiver in the grid that you want to delete and click [DELETE].
-
-
On the Sender tab, supply the address of the sender of the shipment in the following sub-tabs:
Sender Details Tab
In this box...
Do this...
Customer Code
If you use a customer database, click icon to select a record or type the sender code and press the Tab key. When you press the Tab key after specifying the customer code, the search is performed in a specific order.
To enter a new sender that you want to save to the sender database, click icon and add the customer to the Personal, Global, or Mailing address book.
Address Type
From the list, select the address type of the sender.
Country
(required field)From the list, select the country where the sender of the shipment resides.
Company/Name
Type the company name of the sender.
Attention To
Type the customer's name.
Address 1
(required field)Type the sender's street address.
Address 2
Type any additional address information such as apartment number or floor.
Address 3
Type any additional address information such as apartment number or floor.
City
(required field)Type the sender's city.
State/Province
(required field)From the list, select the sender's state or province if shipping to the United States, Puerto Rico, Canada, Mexico, and Australia.
Postal Code/ZIP
(required field)Type the sender's postal code.
Phone/Ext
Type the sender's phone number. This is required for international shipments.
Fax Number
Type the customer's Fax number.
Email
Type the customer's e-mail address if available.
Address
Residential: If you give Sender and Receiver addresses to perform the Home Delivery Return shipments for FedExWS carrier, select the Residential check box.
Validate: If you want to validate the address, select the Validate check box/click the Validate hyperlink. The application also validates that if you are shipping to a P.O. Box that the carrier you select delivers to P.O. Boxes. Suggestions are provided to enable you to input valid values, and error messages warn you of invalid values.
Government Id Tab
In this box...
Do this...
Registration Number Type
From the list, select the Registration Number Type of the Sender.
-
Passport ID
-
Resident ID
-
Company ID
-
Employer Identification Number
-
DUNS Number
-
BUSINESS_NATIONAL
-
BUSINESS_STATE
-
BUSINESS_UNION
-
PERSONAL_NATIONAL
-
PERSONAL_STATE
-
EORI Number
-
VAT Registration
-
Free Trade Zone
-
Social Security Number
-
Data Universal Numbering System
-
Federal Tax ID
-
State Tax ID
-
Brazil CNPJ/CPF Federal Tax
-
Overseas Registered Supplier
-
AUSid GST Registration
-
Import One-Stop-Shop
-
VAT on E-Commerce
-
Her Majesty's Revenue and Customs
-
Deferment Account Duties, Taxes and Fees Only
-
Deferment Account Tax Only
-
Deferment Account Duties Only
For Examples:
-
In the US it can be a DUNS Number, a Social Security Number, or a Government assigned Exporters ID Number (EIN). In Canada it is referred to as the Tax ID Number.
-
In the UK it can be a EORI (Economic Operator Registration & Identification) Number. In UK for DPD Carrier it is referred as the Tax ID Number.
Note: User can enter maximum up to 10 Registration Number Type for each shipment.
Registration Number
Type the Registration Number of the Sender, which is selected from Registration Number Type drop-down field.
Registration Issuer Country
From the list, select the Registration Issuer Country of the Sender.
Note: If user enters at least one field in the Government Id sub-tab, then remaining fields are mandatory and vice versa for DHL carrier.
Use the buttons at the bottom of the Government Id tab as follows:
Click this button...
To...
ADD
Add the Government Id details of the Sender to the grid.
EDIT
Edit the required Government Id details of the Sender in the grid. Select the check box next to the Government Id details of the Sender in the grid that you want to edit and click [EDIT].
After you have completed editing the Government Id details of the Sender, click [SAVE].
CLEAR
Clear the data you entered in the fields.
DELETE
Delete the Government Id details of the Sender from the grid. Select the check box next to the Government Id details of the Sender in the grid that you want to delete and click [DELETE].
-
-
If you need to supply additional addresses for this shipment, click the appropriate tab as follows and supply the address:
Click this tab...
To supply address information for the...
Bill To
Party to whom the bill for shipment charges should be mailed.
Exporter
Exporter of the shipment.
Importer
Importer of the shipment.
-
Complete the lower-left section of the page as follows:
In this box...
Type...
Cost Center
The cost center to which shipment charges should be billed if the shipper is paying.
Reference 1- Reference 5
Additional information about the package.
Notes
Text to appear at the bottom of the shipping label and on the Bill of Lading if one is being used for the package.
-
Complete the Parcel tab as follows:
In this box...
Do this...
Ship Via
If you want to use a Rate Shop key to process the shipment, select it from the list.
Note: By default, all Rate Shop keys created for mapped multiple carriers and multiple locations (origin and destination locations) appear in this list.
Carrier
To use a standard or generic carrier for the shipment, select it from the list.
Service
If you selected a carrier, select the service to use with that carrier from the list.
The order in which services appear in this list is defined on the Vendor ID Mapping page of the System menu.
Delivery Date / Time
If you selected a rate shop key in the Ship Via list, click the calendar to select the date you want the shipment to be delivered.
Then specify the time that you want the shipment to be delivered by on that date by selecting the hour in the first box and the whole or half hour in the second box. For example, if you select 17 in the first box and 00 in the second box, the time that you need the shipment delivered by is 5:00 p.m.
Package Reference
Type a reference description for the shipment.
Shipment Type
From the list, select the type of shipment based on weight. The values available for selection are:
-
Weigh Each Piece
-
Weigh One Piece
-
Weigh Total Shipment
This field appears if Auto Multi Piece is set to 'Yes' in shipper defaults settings.
Piece Weight / Total Weight
Scale SettingsType the weight and select the unit of weight measurement from the list.
If the weight is less than 1 pound, be sure to type a zero before the decimal point. For Example, 0.5.
- or -
Use the continuous reading from the scale if one is attached to your workstation's RS232 port and configured.
This field is displayed as Total Weight if 'Weight Total Shipment' is selected in Shipment Type field.
Package Count
Number of packages in a shipment.
This field appears if either 'Weigh One Piece' or 'Weigh Total Shipment' is selected in the Shipment Type field.
Packaging Type
If you are using a package type specific to your company, select it from the list. The corresponding dimensions automatically appear in the Dimensions boxes.
The items that appear in this list are defined on the Box Size screen in the System > Settings - Locations area.
Dimensions (LxWxH)
If you are using your own box or a commercial parcel carrier's box or tube, do the following:
-
Type the length, width, and height of the package. (Note that these dimensions are not required for envelope, or bag-type packaging.)
-
From the Unit of Measure drop-down list, select one of the following:
-
CM – centimeters
-
IN – inches
LTL Class
If you are processing an LTL or TL shipment, select the class of the shipment from the list. The corresponding NMFC item is then populated.
NMFC (Item - Sub)
This box is populated automatically after you select the LTL Class.
The items that appear in this list are defined on the LTL Class Defaults page of the System menu.
LTL (Type - Unit)
From the list, select the type of packaging used for individual packages of an LTL shipment. Then in the box on the right, type the quantity of those package types in the shipment.
The items that appear in this list are defined on the Handling Type screen in the System > Settings - Locations area.
Handling (Type - Unit)
From the drop-down list, select the type of packaging that individual packages of an LTL shipment are placed in or on. Then in the box on the right, type the quantity of the handling unit in the shipment.
Caution: For a ground freight carrier, you must always enter a numeric value of 1 for the number of units.
For example, if you selected Case in LTL Type and typed 50 for the LTL Unit quantity, then selected Pallet in Handling Type and typed 1 for the Handling Unit quantity, you would have 50 cases on 1 pallet.
The items that appear in this list are defined on the Handling Type screen in the System > Settings - Locations area.
-
-
If this is an international shipment, you must complete both the Items and INTL tabs:
-
Click the following buttons as needed:
Click this button...
To...
SWOG
( Sell With Other Goods )Consolidate multiple shipments into a single shipment. It could be a single package or multi-package shipment with one or more items inside. Perform this activity from UI as well as API (by adding keys in the TOHOLD request).
Use SWOG to send shipments to TOHOLD and then process them.
Parcel keeps track of shipments (that are consolidated using SWOG) in the master shipment. It provides information of the child shipments to the host system to identify which deliveries are shipped and the associated tracking number.
You can search the child shipment numbers associated from the Track Status screen. Track details page displays all the associated child shipments.
Refer the section after this table to know how to process shipment using SWOG.
OPTIONS
Select Special Services for the package.
CLEAR
Clear the information from the Parcel tab.
ADD
Commit the package to the table below this button. You can then ship the package or enter information for another package in the same shipment if it is a multi-package shipment going to the same destination.
Process Shipment Using SWOG
How to process shipment using SWOG (Sell With Other Goods)?
-
Scan and load master shipment as normal.
-
Once master shipment loads, click SWOG button.
The SWOG window appears.
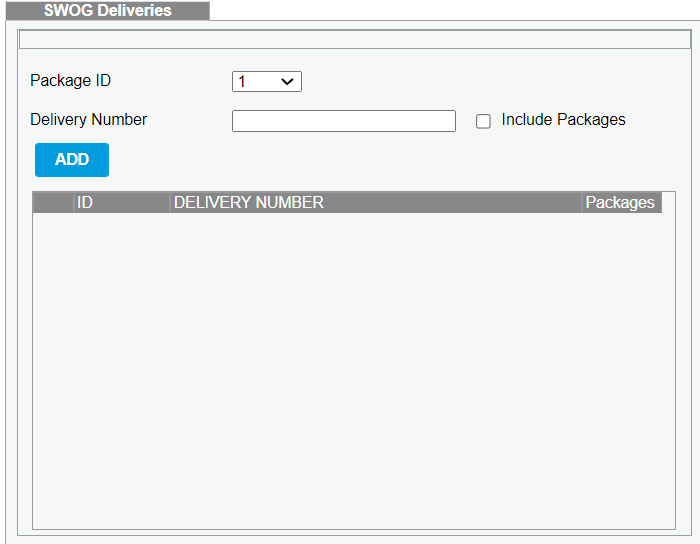
-
Scan additional shipments you want to add to a particular package by selecting the package from Package ID.
Note: To include packages separately from the added shipments, check the Include Packages checkbox. You will be notified for any invalid shipments added. -
Click Submit to update the master shipment.
-
Associated shipments are validated based on the destination details of the shipments that match with the master shipment.
The criteria include Address 1 - Address 2- Address 3 - City - State - Postal Code combination.
Note: Use the key validate_swog in the settings to enable or disable validation. -
Once you submit, Warehouse page gets refreshed and pulls the master shipment again along with the information from the associated shipments.
Check the include packages flag for the shipment to view packages from that shipment in the packages grid.
All the items from the associated shipments will be pulled under the master shipment. The user then ships the master shipment as normal. -
If the shipment is successful, verify the track page to see if any SWOG deliveries are associated with the master shipment.
Important
Once you add the SWOG shipments to the master delivery, the UI page gets refreshed. To avoid losing any manual changes after loading such as selecting accessorial, carrier and service, additional packages that are added: ADD THE SWOG SHIPMENTS IMMEDIATELY AFTER LOADING THE MASTER SHIPMENT
-
-
If you select a package or packages in the table in the lower-right corner of the page (by selecting the check box in the left-most column for that package), you can edit, copy, or delete the selected packages with the buttons below the table.
Click this button...
To...
EDIT
Edit the selected package. After you have completed editing the package, click [SAVE].
DELETE
Delete the selected package from the shipment.
COPY
Copy the selected package if there is more than one identical package in this shipment.
-
If you want to add the shipment to a Batch Shipment, then select the To Batch checkbox and then select the desired batch from the scroll-down list.
-
Use the buttons at the bottom of the page as follows:
Click this button...
To...
CANCEL
Cancel the entire shipment.
RATE
Rate the shipment without shipping. You can rate a shipment in the following ways:
-
Select a carrier from the Carrier drop-down list, select a service from the Service drop-down list, complete the process of setting up the shipment (see previous steps), and then click [RATE]. Parcel displays the estimated rate in the Messages line at the top of the screen. To see a breakdown of the rate, click the rate link to display a popup screen with this information. If you have time in transit configured for the carrier and service, this popup screen also displays Delivery Date and Delivery Time.
-
Select a Rate Shop key from the Ship Via drop-down list. Depending on how this Rate Shop key is configured, Parcel automatically selects the best carrier-service combination or displays a popup screen that lets you select from a list of valid carrier-service combinations (see following Notes).
Notes:
-
If you select a Rate Shop key from the Ship Via drop-down list, and Parcel is configured to display the complete set of Rate Shop results, the [SHIP] is disabled ("grayed out"). When you click [RATE], Parcel displays a popup window listing the valid carriers and services in the Rate Shop, the corresponding shipment charge, and Delivery Date and Delivery Time (if configured). You can then choose which carrier and service to use for the shipment, click the Select link, and then click [SHIP] to process the shipment.
-
If you select a Rate Shop key from the Ship Via drop-down list, and Parcel is configured to automatically select the lowest rate, fastest time in transit, or best combination of the two, when you click [RATE] or [SHIP] Parcel displays the estimated rate at the top of the Warehouse screen. If you click [SHIP], Parcel also processes the shipment using the automatically determined best carrier-service combination.
For more information on configuring a Rate Shop, see the following Help Topic: How to Add a Rate Shop.
SHIP
Ship the shipment. If you want to process the shipment to Hold, select the To Hold check box before clicking SHIP.
If the shipment is successful, the tracking number and total freight charge appear at the top of the page. (See Note below.)
Depending upon your settings, a shipping label might automatically print on the printer configured for your workstation. Or the label might appear on the screen.
Notes:
-
For all carriers and shipments, after a successful Ship operation, Parcel displays a confirmation message in the message bar at the top of the Warehouse screen. This message includes the tracking number of the package or, if the shipment is a multi-package shipment, the tracking number of the first package in the shipment, as well as the carrier and service and the estimated charge for the shipment.
For example: Shipment No:1Z1287610300000027 Carrier : UPS1 Service : UPS Ground Total Calculated Freight: 97
The parameter "Shipment No" is the tracking number for the first package in the current shipment that Parcel just processed. It should not be confused with the parameter "Shipment Number" that is the first field on the Receiver tab of the Warehouse screen and serves to retrieve previous shipments from the database. See the following row in the table under step 3: Shipment Number. -
To display a popup window, click the link on the numerical figure for Total Calculated Freight. The popup window displays the following parameters:
- Total Base Freight Charge
- Fuel Charge
- Total Carrier Discount
- Total Carrier Freight Charge
- Total Customer Freight Charge
-