FedEx Web Services (FedExWS)
Account Number and Services
Note: This module is not currently included in the general release. Please contact Technical Support Team / your Project Manager for more details.
When you add a new FedExWS carrier account (Add Carrier > Carrier > FedExWS), Parcel displays the screen to enter the FedExWS account number. On this screen, you can also select the FedExWS services with which you will ship packages from this location.
To configure the FedExWS Account Number and Services, complete these steps...
-
In the Account Number field, type the FedExWS Account Number for this location.
-
In Carrier Code field, type a name for the carrier as FedExWS only - you want it to appear on the Web Admin (Configuration) Tool screens and on the shipping screens in Parcel.
-
In the Services section, select the services that you will use to ship FedExWS packages from this location by selecting the service, and then click ADD to move the selected service from the left-hand column to the right-hand column. To select and move all of the services at once, click ADD ALL.
You can also use the Move Up and Move Down (up arrow and down arrow) on the right to change the order of the services in the list of following services. Services appear in the configured order on the Services drop-down list on the Warehouse screen.
Service
Description
FedEx Standard Overnight®
Next day delivery by the end of the day – US domestic.
FedEx Economy
Delivery typically in 2–5 business days - CA domestic.
FedEx Standard Overnight™
Next day delivery by the end of the day – CA domestic.
FedEx Home Delivery®
Ground delivery to a residence address - US domestic
FedEx First Overnight®
Early morning delivery – US and CA domestic.
FedEx International Priority®
Overnight delivery – US and CA international.
FedEx 2Day®
Second day delivery – US and CA domestic.
FedEx International First®
Fastest overnight delivery – US and CA international.
FedEx 2Day® Freight
Second day delivery of freight – US domestic.
FedEx International Economy®
Economical air service delivery – US and CA international.
FedEx Express Saver®
Economical air service delivery – US domestic.
FedEx International Economy® Freight
Economical air service delivery of freight – US and CA international.
FedEx 3Day® Freight
Third day delivery of freight – US domestic.
FedEx International Ground®
Ground service – US and CA international.
FedEx 2Day® AM
Second business day delivery by 10:30 AM to most business areas. For certain shipments to Alaska and Hawaii, delivery is in three business days - US domestic.
FedEx International Priority® Freight
Second business day delivery by 10:30 AM to most business areas. For certain shipments to Alaska and Hawaii, delivery is in three business days - US and CA international
FedEx 1Day® Freight
Next day delivery of freight – US and CA domestic.
FedEx Ground®
Next day mid-morning/mid-afternoon delivery – US and CA domestic.
FedEx Priority Overnight®
Next day mid-morning/mid-afternoon delivery – US and CA domestic.
-
When you are done configuring this page, click SAVE in the lower-right corner of the page to save the settings. Otherwise, click CANCEL to cancel the settings.
Disclaimer: The FedEx service marks are owned by Federal Express Corporation and are used by permission.
After configuring a FedExWS carrier, you need to complete the following tasks:
Registration, Subscription and Visioning, Accept EULA screen, see Shipper Defaults.
Shipper Defaults
Overview
Use the following tabs on the FedExWS Shipper Defaults page to configure the default information to use with this FedExWS account.
Tabs
-
General
-
Time in Transit
-
Default
-
Registration
-
MaskData
-
ECOD
-
SmartPost
General Tab
Use the General Tab on the FedExWS Shipper Defaults page to configure various settings of this FedExWS account.
General
|
In this box... |
Do this... |
|
Currency Code |
Type the three-character code for the currency; for example, CAD for Canadian Dollar. |
Defaults
|
In this box... |
Do this... |
|
HostURL |
Type the IP Address or Host URL Name of the FedExWS Server. |
|
Parent Key |
Type the FedExWS Parent Credentials Key, which is used for Registration / Subscription / Version capture of an Account |
|
Parent Password |
Type the FedExWS Parent Credentials Password, which is used for Registration / Subscription / Version Capture of an Account. |
|
Carrier Code |
From the drop-down list, select the FedEx Carrier Code. |
|
CSP Solution ID |
A unique identifier assigned to CSPs by FedEx. |
|
CSP Type |
From the drop-down list, select the type of CSP:
|
|
Vendor Product Platform |
Type the Vendor Product Platform Name. |
|
Version Capture Code |
Type the Version Capture Code. |
|
Routing Code |
Routing code is the information that identifies the route the package or shipment may take. |
|
Mismatch Flag |
Type the element checks for mismatch between state and city values. The City and State is set if CheckForMismatch is true and if country is US or CA. |
User-Subscriber Address
|
In this box... |
Do this... |
|
Title |
Type the Title of User. |
|
Prefix |
Type the Prefix of User. |
|
First Name |
Type the User First Name. |
|
Middle Name |
Type the User Middle Name. |
|
Last Name |
Type the User Last Name. |
|
Suffix |
Type the User Suffix Name. |
|
Company Name |
Type the Company Name of the User. |
|
Street Line 1 |
Type the User Address Street Line 1. |
|
Street Line 2 |
Type the User Address Street Line 2. |
|
Street Line 3 |
Type the User Address Street Line 3. |
|
City |
Type the User City address details. |
|
State |
Type the User State address details. |
|
Country Name |
Type the User Country Name. |
|
Country Code |
Type the User Country Code. |
|
Postal Code |
Type the User Postal Code. |
|
Phone Number Area Code |
Type the User Phone Number Area Code details. |
|
Phone Number Country Code |
Type the User Phone Number Country Code details. |
|
Phone Ext. |
Type the User Phone Extension details. |
|
Fax Number |
Type the User Fax Number details. |
|
Pager Number |
Type the User Pager Number details. |
|
Toll Free Number |
Type the User Toll Free Number details. |
|
Email Address |
Type the User Email address details. |
|
Secondary Email |
Type the user's secondary Email address details. |
Click SAVE in the lower-right corner of the screen to save any changes you made or click CANCEL to revert to the original values.
Time in Transit Tab
Note: Currently FedExWS carrier is not using this feature as it is completely handled by Web Service.
Default Tab
Use the Default tab on the FedExWS Shipper Defaults page to enter the following web service settings for this FedExWS account.
Web Service Settings
|
In this box... |
Do this... |
|
Multi Package Shipment Retry |
To specify multi package shipment retry, select (check) this check box.
|
|
Request/Response Logging |
To specify log request and response in the fedexws_scripts. Log file for more clarity on what has been requested and received from web service, select (check) this check box.
|
|
Hosted (ASP) – EULA |
To specify the differentiate between HOSTED and Distributed systems.
|
Click SAVE in the lower-right corner of the screen to save any changes you made or click CANCEL to revert to the original values.
Registration Tab
Use the Registration tab on the FedExWS Shipper Defaults page to enter the following registration details for this FedExWS account.
Defaults
|
In this box... |
Do this... |
|
Key |
After Registration this Key will be received from Web Service. |
|
Password |
After Registration this Password will be received from Web Service. |
|
MeterNumber |
After Registration this Meter Number will be received from Web Service. |
Shipping Address
|
In this box... |
Type the.. |
|
Street Line 1 |
Type the street first line address of the shipper. This is a mandatory field. |
|
Street Line 2 |
Type the additional address information of the shipper such as suite or floor. |
|
Street Line 3 |
Type the additional address information of the shipper such as suite or floor. |
|
City |
Type the city of the shipper. |
|
State |
Type the two-letter abbreviation state or province of the shipper. |
|
Country Name |
Type the country name of the shipper. |
|
Country Code |
Type the country code of the shipper. |
|
Postal Code |
Type the postal code of the shipper. |
Click SAVE in the lower-right corner of the screen to save any changes you made for registration or click CANCEL to revert to the original values.
On clicking SAVE, the 'End User License Agreement' pop-up screen displays with following three option buttons as follows:
|
Click this button... |
To... |
|
Accept |
Proceed with the registration process. |
|
Decline |
Does not proceed with registration process. It displays the following warning message: "Cannot register Carrier unless the FedEx Web services End User License Agreement is Accepted" with two option buttons: OK and Cancel. Click OK to decline the registration or click Cancel to close the warning message box. |
|
|
Print the EULA Statement. |
MaskData
Use the MaskData tab on the FedExWS Shipper Defaults page to mask data settings for this FedExWS account.
Elements
|
In this box... |
Do this... |
|
Duties and Taxes Account Number |
To Mask duties and taxes account number to FedExWS account, select this check box. |
|
Customs Value |
To Mask a customs value to FedExWS account, select this check box. |
Click SAVE in the lower-right corner of the screen to save any changes you made or click CANCEL to revert to the original values.
ECOD
Use the ECOD tab on the FedExWS Shipper Defaults page to use the FedEx Ground® ECOD service option for receiving the funds within 24 to 48 hours after shipment delivery. Shippers receive Amount via electronic funds transfer. Please contact your FedEx Account Executive for more information about ECOD.
ECOD is not available with FedEx Home Delivery® service. You can ship either C.O.D. and/or E.C.O.D., but you cannot use both services simultaneously under the same meter number. ECOD option is available only for ground service.
Available options with FedEx Ground® ECOD are as follows:
-
FedEx Priority Alert Options
-
Prepaid or third-party billing only
-
Declared Value
-
Alcohol Shipping
-
FedEx Home Delivery Convenient Delivery Options
-
Masked Data
Note: FedEx Ground® ECOD is available for shipments within the U.S. — it is not available for shipments to or within Canada.
General
|
In this box... |
Do this... |
|
Account Number |
Enter the Account Number for E.C.O.D. shipment. |
|
FedEx Ground® Electronic C.O.D. (E.C.O.D.) |
To use FedEx Ground® E.C.O.D. service option to FedExWS account, select this check box. This is a mandatory field. |
Defaults
|
In this box... |
Do this... |
|
Key |
The user key is displayed, after saving General and Shipping Address details. |
|
Meter Number |
The Meter Number is displayed, after saving General and Shipping Address details. |
|
Password |
The Password is displayed, after saving General and Shipping Address details. |
Shipping Address
|
In this box... |
Type the.. |
|
Street Line 1 |
Type the street first line address of the shipper. This is a mandatory field. |
|
Street Line 2 |
Type the additional address information of the shipper such as suite or floor. |
|
Street Line 3 |
Type the additional address information of the shipper such as suite or floor. |
|
City |
Type the city of the shipper. |
|
State |
Type the two-letter abbreviation state or province of the shipper. |
|
Country Name |
Type the country name of the shipper. |
|
Country Code |
Type the country code of the shipper. |
|
Postal Code |
Type the postal code of the shipper. |
Click SAVE in the lower-right corner of the screen to save any changes you made or click CANCEL to revert to the original values.
SmartPost
Use the SmartPost tab on the FedExWS Shipper Defaults page to enter the following web service settings for this FedExWS account.
General
|
In this box... |
Do this... |
|
Pickup Carrier |
From the drop-down list, select the Pickup Carrier.
|
|
Hub Id |
Enter the Hub Id of the selected Pickup Carrier type. |
Click SAVE in the lower-right corner of the screen to save any changes you made or click CANCEL to revert to the original values.
Manage UI Element
Add, Edit, or Delete a UI Element Value
Note: We can use the this feature, but it should not effect the registration process.
You can use the Manage UI Elements feature to accomplish the following tasks:
• Edit existing default values for a UI FedExWS element.
• Add a new default value for a UI FedExWS element and specify an effective date for this value.
• Import a file with default values for a UI FedExWS element together with effective dates for these values.
• Delete existing default values from a UI FedExWS element.
• Restore the original default value for a UI FedExWS element.
Accessing the Edit UI Element Values screen
To access the Edit UI Elements Values screen for a UI FedExWS element...
-
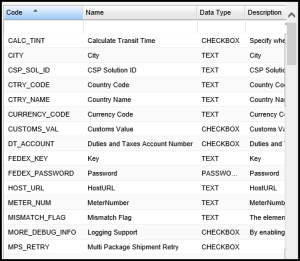
In the left pane of the Parcel Web Admin tool under the FedExWS carrier, click the Manage UI Elements link to display the set of available UI FedExWS elements, as shown in the following example:

-
Double click the UI FedExWS element you want to edit to display the Edit screen with the values for this element, as shown in the following example:
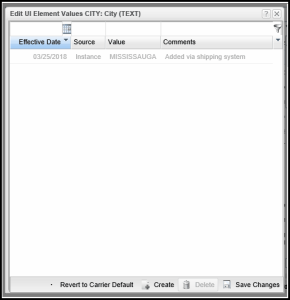
Note: You cannot edit the Source field, which refers to the function of the element. When creating a new value, this field is also non-editable.
Editing an Existing Value
To edit a default value for a UI FedExWS element...
-
On the Edit UI Element Values screen, click the filter icon to activate the data row(s) for editing.
-
Double click the row with the value you want to edit to make the fields editable.
-
Carry out one or a combination of the following tasks:
-
To change the Effective Date for the value, click the calendar icon , and then select the new date.
-
To change the value, type in the new value.
-
-
If desired, update the comment.
Note: If the data type is Checkbox, a checkbox is displayed in the Value column. You can select or clear (deselect) this check box to indicate the default value. -
Click Save Changes to save your changes.
Creating a New Default Value
To create a new default value with an effective date...
-
On the Edit UI Element Values screen, click Create to display a blank row.
-
Carry out the following tasks:
-
To enter the Effective Date for the value, click the calendar icon , and then select the date. (This field is required.)
-
Type in the value. (This field is required.)
-
If desired, include a comment. (This field can be left blank).
-
-
Click Save Changes to save your changes.
Deleting a Value
To delete a value...
-
On the Edit UI Element Values screen, click the filter icon to activate the data row(s).
-
Select the row with the value you want to delete, and then click Delete.
-
Click Save Changes to save your changes.
Restoring a value
To restore a value to the original default:
-
On the Edit UI Element Values screen, click the filter icon to activate the data row(s).
-
Select the row with the default value you want to restore, and then click Revert to Carrier Default Value.
Note: This action restores the value and effective date (and any comment) to the data that were entered for this UI element when the carrier was defined in FedExWS. -
Click Save Changes to save your changes.
Import an Effective Date File with Values
Note: We can use the this feature, but it should not effect the registration process.
You specify a date on which additional default values for UI FedExWS text or numeric fields go into effect by importing a file with these values that includes the effective date.
Importing a file
To import a file with UI element values and effective dates...
-
In the left pane of the Parcel Web Admin tool under the FedExWS carrier, click the Manage UI Elements link to display the set of available UI administrative elements, as shown in the following example:
-
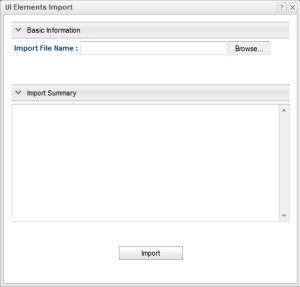
Click Import Values by Date to display the UI Elements Import dialog.
Note: You do not need to select a UI Administrative Element in the list. The code field in the file identifies this element.
-
Click Browse to open the Windows Choose File to Upload dialog, then select the effective date file to import and click Open.
-
On the UI Elements Import dialog, click Import to import the file.
Note: The Import Summary message tells you that the import was successful or provides detailed error messages enabling you to fix any incorrect formatting in the file.
Sequence Data
S1
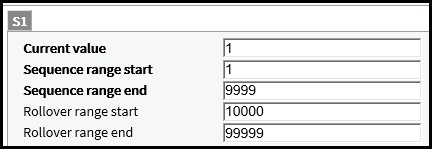
Sequence numbers created for a FedExWS carrier definition translate into a Sequence Data link and screen when in the Parcel carrier instance. The Sequence Data screen includes a tab for each sequence number created in FedExWS, as shown in the following example:
Sequence numbers are used with both tracking numbers and EOD manifests. After you add the carrier to Parcel, you can use this screen to configure the sequence numbers.
Note: There is a corresponding tab on the Parcel FedExWS carrier Sequence Data screen for each sequence number created for the carrier definition in FedExWS. The only default values set in FedExWS are the sequence number length and the amount by which a sequence number is increment. Use the tabs on this screen to set the actual values for the sequence numbers and ranges.
To configure sequence numbers...
-
In Parcel, under the FedExWS carrier, select the Sequence Data link.
-
Configure the data for each sequence number as described in the following table:
In this box...
Enter the following information....
Current value
Next value to be assigned from this sequence number.
Sequence range start
Beginning of the range of numbers this sequence number will generate.
Sequence range end
End of the range of numbers this sequence number will generate.
Rollover range start
Beginning of the rollover range.
Rollover range end
End of the rollover range.
-
Click SAVE or click CANCEL to cancel the operation.
Geographic Codes
Note: Currently FedExWS carrier is not using this feature as it is completely handled by web service.
Transit Days
Note: Currently FedExWS carrier is not using this feature as it is completely handled by web service.
Holidays
Note: Currently FedExWS carrier is not using this feature as it is completely handled by web service.
Import TinT Files
Note: Currently FedExWS carrier is not using this feature as it is completely handled by web service.