Deliv
Account Numbers and Services
When you add a new Deliv carrier account (Add Carrier > Carrier > Deliv), Parcel displays the screen to enter the Deliv account number. On this screen, you can also select the Deliv services with which you will ship packages from this location.
To configure the Deliv Account Number and Services, complete these steps...
-
In the Account Number field, type the Deliv Account Number for this location.
-
In Carrier Code field, type a name for the carrier as Deliv only - you want it to appear on the Web Admin (Configuration) Tool screens and on the shipping screens in Parcel.
-
In the Services section, select the service to ship Deliv packages from this location by selecting the service, and then click \[ADD\] to move the selected service from the left-hand column to the right-hand column. To select and move all of the services at once, click \[ADD ALL\].
Service-
Deliv Choice
-
-
When you are done configuring this page, click \[SAVE\] in the lower-right corner of the page to save the settings. Otherwise, click \[CANCEL\] to cancel the settings.
Shipper Default
Overview
Use the following tabs on the Deliv Shipper Defaults page to configure the default information to use with this Deliv account.
Tabs
Time In Transit Tab
Use the Time In Transit tab on the Deliv Shipper Defaults page to enter settings related to time-in-transit for this Deliv account.
General
|
In this box... |
Do this... |
|
Calculate Transit Time |
To specify calculation of transit times, select (check) this check box. Parcel uses the data that you import using the Import Time in Transit Files screen for transit time calculations.
|
|
Standard Saturday Delivery |
To specify whether or not the carrier can deliver packages on Saturday, select (check) this check box.
|
Click \[SAVE\] in the lower-right corner of the screen to save any changes you made or click \[CANCEL\] to cancel changes and revert to original values.
Note: For information on configuring Time in Transit calculations, see the following Help topics:
-
Overview of TINT Calculation
-
Time in Transit Files (includes Geographic Codes)
-
Importing Time in Transit Files
Defaults Tab
Use the Defaults tab on the Deliv Shipper Defaults page to enter default values for use with this Deliv account.
Unless otherwise notes, all settings apply only to this Deliv account at this location.
General section
|
In this box... |
Do this... |
|
Units of Measure |
To specify the units of measure for packages
|
|
Currency Code |
Type the three-character code for the currency; for example, CAD for Canadian Dollar. |
Settings section
|
In this box... |
Do this... |
|
Max Weight Allowed |
Type the maximum weight allowed for a Deliv Shipment. The default is $50. |
|
Max Price Allowed |
Type the maximum price allowed for a Deliv Shipment. The default is $1000. |
|
In this box... |
Do this... |
|
API Key |
Type the Deliv API Key. |
|
StoreId |
Type the Deliv Carrier Store id. |
|
Service URL |
Type the Deliv Service URL. |
Click \[SAVE\] in the lower-right corner of the screen to save any changes you made or click \[CANCEL\] to revert to previous values.
Manage UI Element
Add, Edit, or Delete a UI Element Value
Note: We can use the this feature, but it should not effect the registration process.
You can use the Manage UI Elements feature to accomplish the following tasks:
-
Edit existing default values for a UI Deliv element.
-
Add a new default value for a UI Deliv element and specify an effective date for this value.
-
Import a file with default values for a UI Deliv element together with effective dates for these values.
-
Delete existing default values from a UI Deliv element.
-
Restore the original default value for a Deliv element.
Accessing the Edit UI Element Values screen
To access the Edit UI Elements Values screen for a UI Deliv element...
-
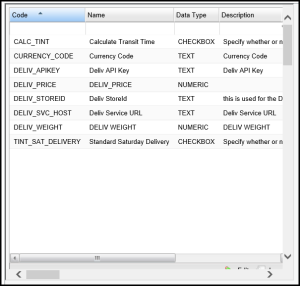
In the left pane of the Parcel Web Admin tool under the Deliv carrier, click the Manage UI Elements link to display the set of available UI Deliv elements, as shown in the following example:
-
Double click the UI Deliv element you want to edit to display the Edit screen with the values for this element, as shown in the following example:
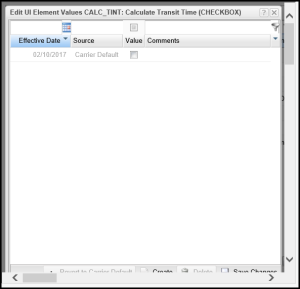
Note: You cannot edit the Source field, which refers to the function of the element. When creating a new value, this field is also non-editable.
Editing an Existing Value
To edit a default value for a UI Deliv element...
-
On the Edit UI Element Values screen, click the filter
 to activate the data row(s) for editing.
-
Double click the row with the value you want to edit to make the fields editable.
-
Carry out one or a combination of the following tasks:
-
To change the Effective Date for the value, click the calendar
 , and then select the new date.
-
To change the value, type in the new value.
-
If desired, update the comment.
Note: If the data type is Checkbox, a checkbox is displayed in the Value column. You can select or clear (deselect) this check box to indicate the default value.
-
-
Click \[Save Changes\] to save your changes.
Creating a New Default Value
To create a new default value with an effective date...
-
On the Edit UI Element Values screen, click \[Create\] to display a blank row.
-
Carry out the following tasks:
-
To enter the Effective Date for the value, click the calendar
, and then select the date. (This field is required.)
-
Type in the value. (This field is required.)
-
If desired, include a comment. (This field can be left blank).
-
-
Click \[Save Changes\] to save your changes.
Deleting a Value
To delete a value...
-
On the Edit UI Element Values screen, click the filter
to activate the data row(s).
-
Select the row with the value you want to delete, and then click \[Delete\].
-
Click \[Save Changes\] to save your changes.
Restoring a value
To restore a value to the original default:
-
On the Edit UI Element Values screen, click the filter
to activate the data row(s).
-
Select the row with the default value you want to restore, and then click \[Revert to Carrier Default Value\].
Note: This action restores the value and effective date (and any comment) to the data that were entered for this UI element when the carrier was defined in Deliv. -
Click \[Save Changes\] to save your changes.
Sequence Data
Sequence numbers created for a Deliv carrier definition translate into a Sequence Data link and screen when in the Parcel carrier instance. The Sequence Data screen includes a tab for each sequence number created in Deliv, as shown in the following example:
Sequence numbers are used with both tracking numbers and EOD manifests. After you add the carrier to Parcel, you can use this screen to configure the sequence numbers.
Note: There is a corresponding tab on the Parcel Deliv carrier Sequence Data screen for each sequence number created for the carrier definition in Deliv. The only default values set in Deliv are the sequence number length and the amount by which a sequence number is increment. Use the tabs on this screen to set the actual values for the sequence numbers and ranges.
To configure sequence numbers...
-
In Parcel, under the Deliv carrier, select the Sequence Data link.
-
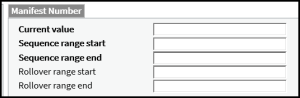
Configure the data for each sequence number as described in the following table:
In this box...
Enter the following information....
Current value
Next value to be assigned from this sequence number.
Sequence range start
Beginning of the range of numbers this sequence number will generate.
Sequence range end
End of the range of numbers this sequence number will generate.
Rollover range start
Beginning of the rollover range.
Rollover range end
End of the rollover range.
-
Click \[SAVE\] or click \[CANCEL\] to cancel the operation.
Geographic Codes
You can use the Geographic Codes screen to add, edit, and delete values for Geographic Codes associated with a Deliv carrier. See the following procedure.
Note: Geographic codes can be added when defining a Deliv carrier, and these geographic codes can be used when the carrier is added to a Parcel location. However, geographic codes included in a Deliv carrier definition are not displayed on the Geographic Codes screen in the Parcel Web Admin tool.
To add a geographic code....
-
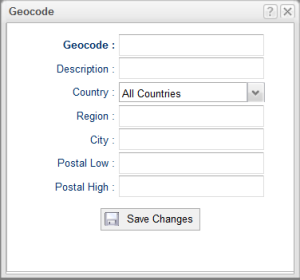
In the Parcel Web Admin tool under the Deliv carrier, click the Geographic Code link to display the Add Geographic Code screen, and then click the plus
 to display the screen for adding a geographic code:
-
Enter values for the following fields:
In this field...
Do this...
Geocode
Enter the geographic code; for example, METFRADEU for Metropolitan Frankfurt, Germany.
Description
Enter the geographic code description; for example: "Metropolitan Frankfurt, Germany" (without quotation marks).
Country
From the drop-list, select the country for which the geographic code applies; for example: Germany
Region
Enter the state, province, or other region containing the postal code range; for example: Hesse
Note: Use the form that is applicable to Parcel for this Deliv carrier. This may be a state/province code or the state, province, or other region spelled out.City
Enter the name of the city; for example: Frankfurt or Frankfurt am Mein.
Note: Use the form that is applicable to Parcel for this Deliv carrier. It is important that this entry be spelled in exactly the form that Parcel recognizes.Postal Low
Enter the lowest postal code for the area included in the geographic code; for example: 60001
Postal High
Enter the highest postal code for the area included in the geographic code; for example: 60599
-
Click \[Save Changes\] to save your changes or click \[x\] to exit the screen without saving.
To edit, delete, or filter geographic codes...
-
To edit a row of geographic code data, select the row, and then click the pencil
 to display the editing screen. Fields are identical to the Add Geographic Code screen show in the previous illustration. Make any required changes, and then click \[Save Changes\] to save your changes or click \[Cancel\] to exit the screen without saving.
 -
To delete a row of geographic code data, select the row, and then click the Delete
 . Note that no confirm dialog is displayed and there is no undo for this operation.
-
To filter a list of geographic codes, enter a filter criterion in the row with the filter
, and then click the filter
. For example, to filter by date, enter or select the date to filter by, and then click the filter
.
Transit Days
You can use the Transit Days screen to add, edit, and delete the Transit Days associated with a Deliv carrier. See the following procedure.
Add Transit Days
To add services and geographic codes for transit time calculations...
-
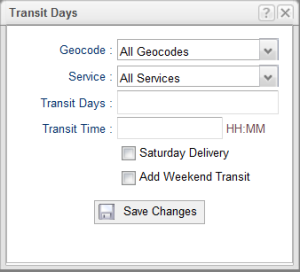
Click the Transit Days link under the Deliv carrier, and then click the plus
to display the Add Record screen for entering transit days (shown in the following illustration with the defaults for the Geocode and Service fields):
-
Enter the following values:
-
From the Geocode drop-down list, select the geographic code for which you want to specify transit time or leave the default All Geocodes to apply the transit days to all geographic codes.
-
From the Service drop-down list, select the service for which you want to specify transit time or leave the default All Services.
-
In the Transit Days field, enter a whole number for the number of transit days to associate with the geocode(s) and service(s) specified in steps 2a and 2b; for example: 2
In the Transit Time field, enter a time in the form HH:MM. -
If Saturday Delivery is allowed with this service for this geographic code, select the Saturday Delivery check box.
-
To add two days to the delivery date if Saturday and Sunday are not counted as transit days, select the Add Weekend Transit check box.
-
-
Click \[Save Changes\] to add this record to the table on the Transit Days screen or click \[x\] to exit without saving.
Edit, Delete, or Filter Transit Days
-
To edit a row of Deliv carrier transit days, select the row with the data, and then click the pencil
to display the editing screen. Fields are identical to the Add screens show in the previous illustrations. Make any required changes, and then click \[Save Changes\] to save your changes or click \[Cancel\] to exit the screen without saving. -
To delete a row of transit days, select the row, and then click Delete
. Note that no confirm dialog is displayed and there is no undo for this operation.
-
To filter a list of transit days, enter a filter criterion in the row with the filter
, and then click the filter
. For example, to filter by date, enter or select the date to filter by, and then click the filter
.
Holidays
You can use the Holidays screen to add, edit, and delete the Holidays associated with a Deliv carrier. See the following procedure.
Add Holidays
To add a holiday with transit time option for a carrier service...
-
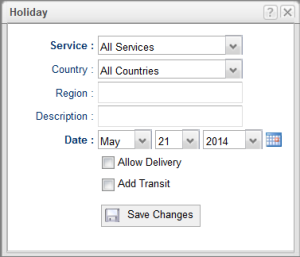
Click the Holidays link under a carrier that supports this option, and then click the plus
 to display the Add Record screen for entering transit days for services and Geographic codes:
-
Enter the following values:
-
From the Service Name drop-down list, select the service for which you want to specify a holiday or leave the default All Services.
-
From the Country drop-down list, select the country for which you want to specify a holiday or leave the default All Countries.
-
In the Region field, optionally enter the state, province, or equivalent region within the selected country (or leave blank if you selected All Countries for the previous value).
-
In the Description field, optionally enter a description of the holiday.
-
In the Date field, select the month, date, and year from these respective drop-down lists or click the calendar
and select a date.
-
If delivery on this holiday is allowed for this service and country, select the Allow Delivery check box.
-
To add one day to the delivery date if the holiday is not counted as a transit day, select the Add Transit check box.
-
-
Click \[Save Changes\] to add this record to the table on the Holidays screen or click \[x\] to exit without saving.
Edit, Delete, or Filter Holidays
-
To edit a row of Deliv carrier holidays data, select the row with the data, and then click the pencil
to display the editing screen. Fields are identical to the Add screens show in the previous illustrations. Make any required changes, and then click \[Save Changes\] to save your changes or click \[Cancel\] to exit the screen without saving. -
To delete a row of holidays data, select the row, and then click Delete
. Note that no confirm dialog is displayed and there is no undo for this operation.
-
To filter a list of holidays, enter a filter criterion in the row with the filter
, and then click the filter
. For example, to filter by date, enter or select the date to filter by, and then click the filter
icon.
Import TinT Files
Transit time calculations for Deliv require user-maintained transit time data. You can import this data into the Parcel carrier database using the Import Time in Transit Files screen.This feature also includes the capability for the user optionally to import and maintain Work Days and carrier Holidays at the destination level for the Time in Transit calculation to include when calculating an expected delivery date.
You must create and maintain the following Time in Transit for data import:
-
Geographical information (origin/destination cities, postal codes, etc.) - Required for first import.
-
Time in transit data based on carrier service and destination - Always required.
-
Holiday file containing information about destination holidays - Optional
-
Weekend file containing information about the days the carrier operates - Optional
When you import these files, Parcel inserts the data from these files into the Deliv carrier database.
Notes:
-
Since the US Post Office (USPS) does not guarantee delivery dates or times, time in transit calculations for carriers such as Deliv are based on user estimate of typical delivery times for specific services and routes.
-
All files that you import must be located on a local drive of the DIServer. The absolute path that you specify according to the following table represents the file location on the DIServer.
-
This data does not come from Deliv and must be specified by the customer.
Import Time in Transit Files
Use the Import Time in Transit screen to import the following data files for transit times and locations (origins and destination (required files are in bold).
To import Time in Transit files:
-
Create the Time in Transmit files (see the following section for file format information), and then copy these files to a directory local to the Parcel DIServer.
-
Use the Import Time in Transit screen in the Parcel Configuration (Web Admin) tool to specify the path names and filenames for these files according to the following table:
In this box...
Do this...
Geographic Data File (Provide absolute Path)
Type in or paste in the absolute local path for this file on the Parcel DIServer, including the filename.
Note: This file is required the first time you import the set of Time in Transit files but is optional on subsequent file imports.Time in Transit File (Provide absolute Path)
Type in or paste in the absolute local path for this file on the Parcel DIServer, including the filename.
Holiday File (Provide absolute Path)
Optionally, to include carrier holidays in Parcel's time in transit calculation, type in or paste in the absolute local path for this file on the Parcel DIServer, including the filename.
Weekend File (Provide absolute Path)
Optionally, to include carrier weekend days in Parcel's time in transit calculation, type in or paste in the absolute local path for this file on the Parcel DIServer, including the filename.
Format for Time in Transit Files
The time in transit files that you import (see previous section) must be comma-delimited CSV files of which the first row consists of the column (field) names listed in the following table. Subsequent rows contain comma-delimited data corresponding to the column names.
Notes:-
You can copy and paste the following column name strings directly into the CSV file.
-
The values in the Geo Code fields can be arbitrarily defined, but since this column serves as the primary key, they must follow the same convention in all the files.
-
The Origin and Destination address data for a shipment must be identical to the corresponding data in the Geographic Data file (Address <n>, City, State).
-
The values for Transit Days and Transit Time are those estimated for the route defined by the Origin Geo Code and Destination Geo Core.
-
The values for the day columns in the Weekend file are: "y" (without quotation marks) if the day is a weekend day and "n" (without quotation marks) if it is not a weekend day.
-
|
File Type |
Required column names |
|
Geographic Data File |
Address 1,Address 2,Address 3,City,State,Country,Low Postal Code,High Postal Code,Geo Code,Geo Code Description,Record Type |
|
Time in Transit File |
ServiceId,Origin Geo Code,Destination Geo Code,Transit Days, Transit Time(HH24:MM:DD) |
|
Holiday File |
Destination Geo Code,Holiday Date(YYYYMMDD),Holiday Description |
|
Weekend File |
Destination Geo Code,Sunday, Saturday |
Managing Custom Rates and Zones
Updating Rates and Zones
You can use the following screens to update values for rates and zones:
-
Manage Custom Rates
-
Manage Custom Zones
-
Managing Custom Rates
To manage custom rates...
-
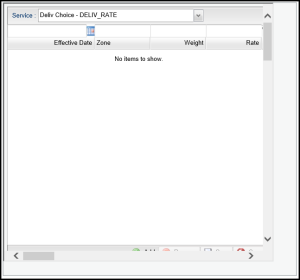
In the Parcel Web Admin tool under the Delivcarrier, click the Manage Custom Rates link to display the Manage Custom Rates screen:
-
Under the Services bar, select a Service to manage rates for from the drop-down list. This selection displays any existing rates that were added for this service in Parcel by using this screen or importing a data file. (See the following Help topic: Importing Custom Data .)
-
Carry out the following tasks:
-
To add a row of rate data, click the plus
to display a blank row. Click click the calendar
to specify an Effective Date for the rate or enter a date in the form YYYY/MM/DD, and then enter the remaining data for the rate. (This varies according to the type of rating method. See the following Help topic:
Rate File Formats
.)
-
To delete a row of rate data, select the row, and then click Delete
. (Note that no confirm dialog is displayed and there is no undo for this operation.)
-
To filter a list of rates, enter a filter criterion in the row with the filter
, and then click the filter
. For example, to filter by date, enter or select the date to filter by, and then click the filter icon.
-
-
Click \[Save Changes\] to save your changes or click \[Cancel Changes\] to revert to the original values.
Managing Custom Zones
To manage custom zones...
-
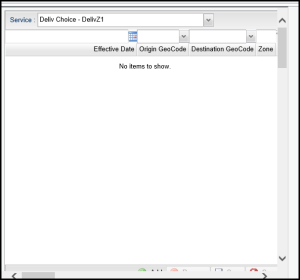
In the Parcel Web Admin tool under the Deliv carrier, click the Manage Custom Zones link to display the Manage Custom Zones screen:
-
Under the Services bar, select a Service to manage zones for from the drop-down list. This selection displays any existing zones that were added for this service in Parcel by using this screen or importing a data file. (See the following Help topic: Importing Custom Data .)
-
Carry out the following tasks:
-
To add a row of zone data, click the plus
to display a blank row. Click click the calendar
to specify an Effective Date for the route or enter a date in the form YYYY/MM/DD, and then enter the remaining data for the route. (See the following Help topic:
Route and Zone File Formats
.)
-
To delete a row of zone data, select the row, and then click Delete
. (Note that no confirm dialog is displayed and there is no undo for this operation.)
-
To filter a list of zones, enter a filter criterion in the row with the filter
, and then click the filter
. For example, to filter by date, enter or select the date to filter by, and then click the filter
.
-
-
Click \[Save Changes\] to save your changes or click \[Cancel Changes\] to revert to the original values.
Importing Custom Data
You can import rates and zones using the Import Custom Data screen.
Note: For the formats of each type of data file, see the following Help topics:
-
Rate File Formats
-
Zone File Formats
To import custom data...
-
In the Parcel Web Admin tool under the Deliv carrier, click the Import Custom Data link to display the Import Custom Data screen:
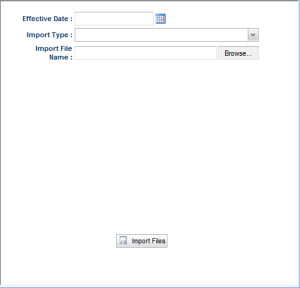
-
Click the calendar
and specify an effective data for the rates, routes, or zones that you are importing.
-
From the Import Type drop-down list, select one of the following types of objects, together with its associated Delic carrier service, for which you are importing a file with values:
-
Rate
-
Zone
-
-
Click \[Browse\] to open the Windows Choose File to Upload dialog, then select the effective date file to import and click \[Open\].
-
On the UI Elements Import dialog, click \[Import\] to import the file. Parcel now displays this data on the appropriate "Manage" screen for the selected service. See the following Help topic: [ Adding Rates and Zones|Manage_Custom_Rates] .