Carrier Configuration
Overview
This version of Parcel includes the carriers listed below. For instructions on configuring a specific carrier, click on the following link for that carrier:
Note: Only carriers that are supported for the location country of origin are displayed under that location in the Parcel Web Admin tool.
Carrier Account Number field names and lengths
In order to add and configure a carrier in Parcel, you must enter an Account Number provided by the carrier in the field provided for this information. Account number lengths vary by carrier. As a result, the fields that Parcel provides for this information have variable maximum lengths depending on carrier. The following table lists and describes the Account Number fields and maximum field lengths for the carriers listed above:
|
Carrier |
Field Name on UI |
Maximum Field Length |
|
Canada Post (CAPO) |
Account Number |
7 |
|
DHL |
Account Number |
20 |
|
DHL Global (DHLG) |
Carrier Code |
12 |
|
DPD |
Account Number |
10 |
|
Federal Express (FedEx) |
Account Number |
20 |
|
FedEx Web Services (FedExWS) |
Account Number |
20 |
|
FedEx Ground® Economy |
Account Number |
9 |
|
Generic Carrier |
Account Number |
9 |
|
Newgistics |
Account Number |
20 |
|
OnTracWS |
Account Number |
10 |
|
Purolator GA |
Account Number |
10 |
|
TNT Express |
Account Number |
13 |
|
United Parcel Service (UPS) |
Account Number |
6 |
|
UPS Canada (UPS CA) |
Account Number |
6 |
|
UPS Europe and Asia Pacific |
Account Number |
6 |
|
UPS Supply Chain Solutions (UPS SCS) |
Account Number |
20 |
|
United States Postal Service (USPS) |
Account Number |
20 |
Cautions:
-
The Parcel UI enforces Account Number lengths for some but not all of the carriers listed in the table above by not allowing entry of numbers with lengths greater than the maximum. However, if you add a carrier with an Account Number length that exceeds the maximum value, Parcel may not save any data you enter for that carrier. You must delete and re-add the carrier with the correct Account Number.
-
The field lengths listed in the previous table reflect the maximum number of characters that can be typed in the field. The actual account number that you receive when you set up an account with the carrier may be shorter than this maximum allowed length. Be careful to accurately type in the Account Number that you received from the carrier.
How to configure Parcel components
For instructions on configuring a specific carrier, see the Help topics under that carrier. The following topics provide general instructions for configuring functionality in Parcel
How To Add and Configure Components
How To Add a Carrier
The process of setting up a new carrier in Parcel consists of the following stages:
-
Adding the carrier to an existing location.
-
Configuring settings for the carrier and importing any required files.
Adding a carrier
You can add a carrier to any of the
locations
you have defined in the Web Admin (Carrier Configuration) tool. To do so, carry out the following procedure.
Notes:
-
You can add only carriers that you purchased for use with Parcel.
-
Before adding a carrier, you need to ensure that you have added at least one location in the Web Admin tool. If this is not the case, you need to add a location first. To do so, see the Add Location topic.
-
To add a carrier to a location, you must be logged in to Parcel as a user with the Application Administrator role. For information on this role, see the following Help topics: User Management and User Accounts > Roles.
To add a carrier, complete the following steps:
-
From the Parcel System menu select Settings > Locations to display the Web Admin tool in the left pane.
-
In the left pane, select the location (click on the plus icon next to the location folder) for which you want to add a carrier.
-
Select the Carriers folder (click on the plus icon next to the Carriers folder) to display a list of available options and carriers.
-
Click on the Add Carrier link to display the Add Carrier screen in the right pane.
-
From the Carrier drop-down list, select the carrier you want to add. This step displays the additional fields to fill in for that carrier (see step 6), as well as a list of services to select from.
Note: The list of available carriers depends both on the carriers included in your Parcel distribution and on the location country. Carriers available for a particular location are those for which that country is a valid country of origin for a carrier. For a table of supported carriers by country, see the following Help topic: Global Settings - Add Location
-
Fill in the following fields:
In this box...
Do this...
Account Number
Type the Shipper Account Number that you received when you set up your account with the carrier.
Domestic Code/Carrier Code
Type a unique identifier for the carrier. This identifier should be alphanumeric (hyphens allowed).
For example, if you are adding a second account for UPS to the same location, you might type "UPS-2" (without quotation marks) in the Carrier Code box.
Note: This is the identifier that Parcel displays for the carrier in the Web Admin pane and also in the Warehouse screen Carrier drop-down list for the location.Additional fields
Parcel may display additional fields for some carriers that require more information such as special account numbers or configuration options. For more information on these, as well as the services available for each carrier see the links under the Carrier Account Number and Services section.
-
In the Services list box on the left, specify the services you want to include for this carrier as follows:
-
Use the standard Windows method to select the services you want to add.
-
Click ADD to add the selected services to the list box on the right or click ADD ALL to add all the services. Use the REMOVE and REMOVE ALL to edit the list as needed.
-
Select a service in the right list box and use the up and down arrow buttons to change its position in the list.
Note: The services in the right list box appear in the Service drop-down list for the carrier on the Warehouse screen as configured in this step. For the services available for each carrier see the links under the Carrier Account Number and Services section
-
-
Click ADD in the lower right portion of the screen to add the carrier to the location or click CANCEL to cancel adding a new carrier. If you clicked ADD, the new carrier is added to the selected location and appears in the carrier tree in the left pane for that location.
-
If Parcel displays the following message: "Please restart server," select the System menu, and then select Parcel Refresh and click REFRESH.
Configuring a carrier
After adding a carrier, you need to complete the configuration screens for the new carrier before you can begin using it. The screens that you need to complete depend on the carrier that you added. These are described in the Help topics linked to in the following section.
Carrier Account Number and Services
For information on configuring specific carriers with Account Number, Services, and additional configuration screens, see the following Help topics:
How To Add a Rate Shop
When processing a package, if you do not select a specific carrier and service from the carrier and service drop-down lists on the Warehouse screen, you can use Parcel's Rate feature to compare rates of different carriers. You can also use Rate to compare a selected carrier's services for both rates and time in transit. The options that Parcel provides depends on how you set up the Rate Shop. Use the Rate Shop dialog to do the following:
-
Set up a rate shop for a single carrier by specifying only that carrier's services (or a subset of those services).
-
Set up a rate shop that includes multiple carriers by specifying the services from multiple carriers (see step 4 of the following procedure).
-
Configure how the rating process handles Time in Transit.
Note: You can add as many rate shops to a location as you wish in order to capture various combinations of carriers and services. The Rate Shops that you add to a location are displayed in the Ship Via drop-down list on the Warehouse screen.
To add a Rate Shop, complete these steps:
-
In the left-hand pane, select the location to which you want to add a Rate Shop. If there aren't any locations defined yet, you need to add a location first.
-
Click the Add RateShop link under the Rateshop section to display the Add RateShop screen.
-
In the Rate Key field, type a unique ID to use for this Rate Shop. The value you enter for Rate Key is displayed in the Ship Via drop-down list on the Parcel Warehouse screen.
-
Select the services you want to include in the Rate Shop by following these directions...
To...
Do this...
Add services to the Rate Shop
Select them in the left-hand window, then click ADD. To create a Rate Shop for all carriers and all services under the location, click ADD ALL.
Remove services from the Rate Shop
Select them in the right-hand window, then click REMOVE.
Change the order of carriers in the right text box
Select a carrier and then click UP or DOWN to move the carrier and its associated services up or down in the list.
Note: When Rate Shop compares carriers and services, in case of a tie Parcel chooses the first carrier and/or service in the list. (See table in step 6.)
Change the order of services in the right text box
Select a service and then click UP or DOWN to move the service up or down in the list.
Note: When Rate Shop compares carriers and services, in case of a tie Parcel chooses the first service in the list. (See table in step 6.)
-
From the drop-down list, select one of the following options:
If this option is specified...
And you select this Rate Shop from the Warehouse screen Ship Via drop-down list...
No Auto-select
The Ship is disabled (grayed out). When you create a shipment and then click RATE, Parcel displays a popup window listing all the valid services with associated costs for the shipment. If you have time in transit configured, this popup window also displays time in transit in the form of Delivery Date and Delivery Time (24 hours), as well as the method by which time in transit was determined. Use the links in this window as follows:
-
Click the Rate link to display a popup window with a breakdown of the rate calculation.
-
Click the Select link to return to the Warehouse screen with this carrier and service specified for the shipment.
-
Click the Ship link to process the shipment directly with this carrier and service.
The Rate Shop popup window provides the following information -
Carrier
-
Service
-
Rate
-
Delivery Date
-
Delivery Time
-
Status
Notes: -
The Status field indicates the source of the time in transit and can display the following values: - Default: Parcel used the default data in the carrier database to calculate the time in transit. - Error: Time in transit is configured for the carrier and service but no data could be found. - Local: Parcel used data imported with the user-supplied time in transit files to calculate time in transit. - Remote: Parcel retrieved the time in transit data from the carrier.
-
If this option is cleared (de-selected) for this rate shop so that Auto-select is in effect, if a shipment fails with the selected carrier/service, Parcel changes the carrier/service to the auto-selected carrier/service.
Lowest Cost
When you click SHIP, Parcel automatically selects the carrier and service with the lowest cost. In case of a tie, Parcel selects the first carrier-service combination in the Rate Shop list (see table in step 4).
Fastest Time
If time in transit is enabled, when you click SHIP, Parcel automatically selects the service with the shortest time in transit. In case of a tie, Parcel selects the first carrier-service combination in the Rate Shop list (see table in step 4).
Lowest Cost and Fastest Time
If time in transit is enabled, when you click SHIP, Parcel first selects the lowest-cost carrier-service combination. If the cost is the same for two or more carriers and/or services, Parcel then selects the carrier-service combination with the fastest delivery time. In case of a tie, Parcel selects the highest carrier-service combination in the Rate Shop list (see table in step 4).
Notes
-
For information on enabling and setting up time in transit, see the following Help topics: - Shipper Defaults > Time in Transit tab Help topic for a specific carrier.
- Overview of TINT Calculation
- Time in Transit Files
- Importing Time in Transit Files -
For information on using Parcel's Rate Shop feature, see the following Help Topic: Processing a Shipment - Main Steps
-
-
Click SHIP to save the Rate Shop.
How to Configure Spot Rating
What is Spot Rating?
Spot rating enables the Sender to enter a custom rate for a shipment. For example, if a shipper has pre-negotiated a set rate with a supported carrier for a particular type of shipment, the user can simply enter this rate in a field on the Warehouse screen. Parcel uses this rate to calculate the charges for the shipment. The charges for the shipment are redistributed using the provided spot rate. This redistribution is based on the ratio of package-weight to shipment-weight.
Spot rating is supported for the following (US domestic only) carriers in Parcel:
-
Federal Express (FedEx)
-
United Parcel Service (UPS)
-
United States Postal Service (USPS)
Configuring Spot Rating involves the following procedures:
-
Enabling spot rating when configuring a carrier for which spot rating is supported.
-
Assigning the Spot Rating module to a Group so that this module can, in turn, be assigned to specific Roles and Users.
Enabling Spot Rating
To enable Spot Rating:
-
From the System menu, select Settings > Locations.
-
In the Web Admin tool (left panel), select a carrier to configure that supports Spot Rating (see list above).
-
Add the carrier if it is not currently configured or select a configured carrier, and then select Shipper Defaults.
-
On the Shipper Defaults screen, select the Defaults tab, and then activate (check) the Spot Rating check box.
-
Click SHIP to save your settings.
For a user assigned to a Group whose roles include Spot Rating (see following procedure), the Spot Rating field now appears in the lower right corner when processing a shipment with the carrier(s) for which Spot Rating was configured.
Assigning the Spot Rating module
To assign the Spot Rating module to a Group:
-
From the System menu, select User Accounts > Groups.
-
Select or create the Group to which you want to add the Spot Rating module, and then click VIEW or ADD.
-
On the groups screen, select the Spot Rating module in the Denied Modules list and click the right arrow to add it to the Assigned Modules list, and then click UPDATE or SAVE (depending on whether you are adding this module to an existing group or creating a new group with this module assigned to it).
-
Add any users whom you want to see the Spot Rating field on the Warehouse screen to the Group to which you assigned the Spot Rating module.
For more information on adding a Module to a Group and assigning users to a group, see the user management Help topics under Menus > System > User Accounts.
Using Spot Rating
When a user belonging to the Spot Rating group creates a shipment on the Warehouse screen, he or she can enter a dollar amount in the Spot Rating field before clicking SHIP, and Parcel will then use this amount as the Rate for the shipment.
How to Configure Time in Transit ?
Overview of Time in Transit Calculation
If you enable time in transit (TinT) calculation for a specific carrier that does not have a system that provides time in transit data, Parcel requires a set of correctly formatted time in transit files for that carrier to be imported into the Parcel database. Parcel uses the data from these files to calculate time in transit for a shipment as follows:
-
If you have it configured, for a carrier that has a system that provides time in transit data, Parcel first attempts to retrieve the time in transit from the carrier's system. If successful, Parcel displays this value for time in transit. If for some reason this data cannot be retrieved, Parcel then calculates time in transit based on the data in the imported time in transit files or resident Parcel system data.
-
For carriers that do not have a system that provides time in transit data, Parcel calculates time in transit directly from the data in the imported time in transit files or resident Parcel system data.
Note: Time in Transit files are user-created and maintained with help from e2open, LLC. Support as needed.
Supported Carriers
Time in Transit calculation is supported for the following carriers:
|
Carrier |
Internal Parcel TinT |
Carrier System TinT |
|
Canada Post |
Yes |
No |
|
DHL |
Yes |
No |
|
DHL Global (XML-PI) |
No |
Yes |
|
DPD |
No |
No |
|
FedEx
|
Yes* |
Yes |
|
FedEx Ground® Economy |
Yes |
No |
|
Generic Carrier |
Yes |
No |
|
Newgistics |
Yes |
No |
|
OnTracWS |
Yes |
No |
|
Purolator GA
|
No |
Yes* |
|
TNT Express |
Yes |
No |
|
UPS
|
Yes |
Yes |
|
UPS Canada |
Yes |
Yes |
|
UPS Europe and Asia Pacific |
Yes |
Yes |
|
UPS SCS |
Yes |
No |
|
USPS |
Yes |
No |
For each supported carrier, there is a configuration screen that enables you to import the data from the required time in transit files and the optional Weekends screen. Additionally, there are screens, one for each file type, that enable you to edit this data after it has been imported. These screens are located under each carrier in the Web Admin tool in the following order:
-
Transit Days, Weekends, and Holidays
-
Time in Transit Files and Import Time in Transit Files .
For more information on these screens, as well as the formats for the time in transit files, click the previous links.
Carriers that Provide Time in Transit Data
For these carriers, use the Time in Transit tab on the Account Defaults screen to enable Time in Transit calculation and specify the connection parameters for the carrier data.
Carriers That Do Not Provide Time in Transit Data
For these carriers, use the Time in Transit tab on the Account Defaults screen to enable Time in Transit calculation.
How Time in Transit Is Calculated and Displayed
The Transit days (time in transit) that Parcel calculates are the expected number of days it takes the carrier to transport a shipment to the destination geocode via the specified service. Parcel then converts calculated transit days to an expected delivery date that is displayed. This delivery date is calculated by adding the transit days to the ship date while taking the following considerations into account:
-
Delivery does not occur on Sunday.
-
Delivery does not occur on Saturday unless Saturday Delivery is configured for the carrier and service and enabled for Time in Transit.
-
Delivery does not occur on holidays defined in the Holidays table as not allowing delivery.
-
For FedEx Ground and FedEx Home Delivery and for UPS Ground, which days count as weekend days. (The default is Saturday and Sunday.)
The delivery date is calculated to be the first date on or after the ship date plus transit days where none of the previous circumstances disallows delivery.
Additionally, there are fields on the following screens that enable you to further configure transit times. For information on these, see the following Help topics:
-
Transit Days, Weekends, and Holidays
-
Time in Transit Files and Import Time in Transit Files
Transit Days, Weekends, and Holidays
For supported carriers, the screens that enable you to add transit days and holidays allow you to configure how weekends and holidays are managed with time in transit calculations.
Notes:
-
When you import a time in transit file or a holiday file, the data in this file appears in the table on the corresponding screen. For information on the fields on these screens as well as file formats, see the following Help topic: Time in Transit Files .
-
For information on how the time in transit flags on these screens behave, see the table in the following section: Example: How TinT options are calculated .
Transit Days
To add services and geographic codes for transit time calculations...
-
Click the Transit Days link under a carrier that supports this option, and then click the plus icon to display the Add Record screen for entering transit days:

-
Enter the following values:
-
From the Carrier Service drop-down list, select the service for which you want to specify transit time or leave the default All Services.
-
From the Geographic Code drop-down list, select the geographic code for which you want to specify transit time or leave the default All Geocodes.
-
In the Transit Days field, enter a whole number; for example: 2
-
In the Transit Time field, enter a time in the form HH:MM:SS.
-
If Saturday Delivery is allowed with this service for this geographic code (or all geocodes), enter Y in this field; if not allowed, enter N.
-
To add two days to the delivery date if Saturday and Sunday are not counted as transit days, enter Y in the Add Weekend Transit field; if not, enter N.
-
-
Click SAVE to add this record to the table on the Transit Days screen or click CANCEL to exit without saving.
Holidays
To add a holiday with transit time option for a carrier service...
-
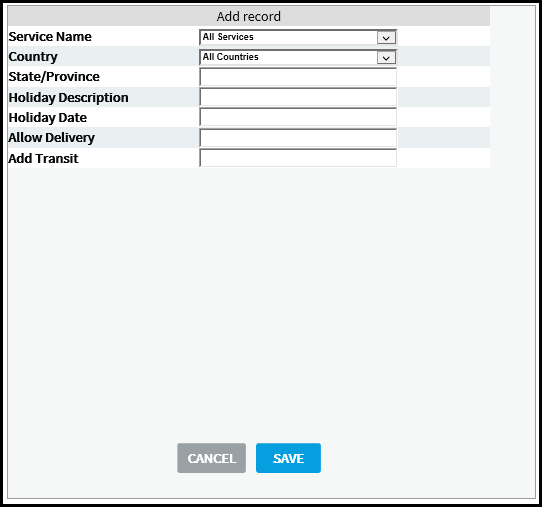
Click the Holidays link under a carrier that supports this option, and then click the plus icon to display the Add Record screen for entering transit days for services and Geographic codes:
-
Enter the following values:
-
From the Service Name drop-down list, select the service for which you want to specify a holiday or leave the default All Services.
-
From the Country drop-down list, select the country for which you want to specify a holiday or leave the default All Countries.
-
In the State/Province field, optionally enter the state, province, or equivalent region within the selected country (or leave blank if you selected All Countries for the previous value).
-
In the Holiday Description field, optionally enter a description of the holiday.
-
In the Holiday Date field, enter the date of the holiday in the form YYYY-MM-DD; for example: 2012-12-25.
-
If delivery on this holiday is allowed for this service and country, enter Y in the Allow Delivery field; otherwise, enter N.
-
To add one day to the delivery date if the holiday is not counted as a transit day, enter Y in the Add Transit field; otherwise, enter N.
-
-
Click SAVE to add this record to the table on the Holidays screen or click CANCEL to exit without saving.
Weekends
Note:
Currently, Parcel supports this functionality only for FedEx Ground® and FedEx Home Delivery® services and for UPS Ground® services.
To add a weekend with transit time option for a carrier service...
-
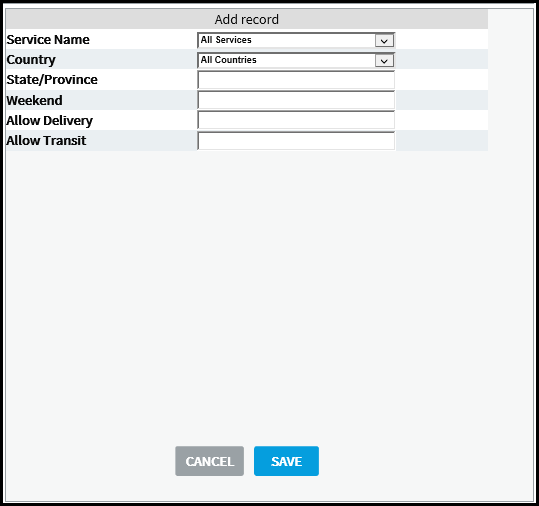
Click the Weekends link under a carrier that supports this option, and then click the plus icon to display the Add Record screen for entering transit days for services:
-
Enter the following values:
-
From the Service Name drop-down list, select the service for which you want to specify a weekend (see the previous Note).
-
From the Country drop-down list, select United States, since weekend TinT functionality currently applies only to domestic FedEx Ground®, FedEx Home Delivery®, and UPS Ground® shipments.
-
From the State/Province drop-down list, optionally select the U.S. state for which this TinT calculation applies or select All States
-
In the Weekend field, optionally enter the weekend day in the form of an abbreviation consisting of the first three letters of the day in English; for example:
Saturday - SAT
Sunday - SUN -
If delivery on this weekend day is allowed for this service, enter Y in the Allow Delivery field; otherwise, enter N.
-
If the weekend day is a transit day, and the delivery time will be shortened by one day, enter Y in the Allow Transit field; otherwise, enter N.
Notes:
-
If you set up a record for SAT, then you are required to set up a record for SUN. In this case, you can set Allow Delivery and Add Transit both to N.
-
If you set Allow Delivery to Y, then you must set Allow Transit to Y.
The following example shows this screen filled out for the FedEx Ground® service for all U.S. states with Saturday as the weekend day, allowing Saturday delivery and counting Saturday as a transit day:
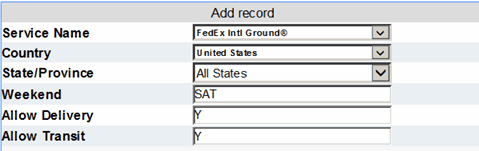
Note: The default is not to count weekend days (Saturday and Sunday) as transit days.
-
-
-
Click Save to add this record to the table on the Weekends screen or click Cancel to exit without saving
Examples: How TinT options are calculated with weekends and holidays
For the possible settings with Time in Transit and Holidays, the following table lists and describes the possible delivery days for the following example: Time in transit is two days. Pickup is on Thursday.
|
Friday is... |
Add Weekend Transit is... |
Add Transit is... |
Saturday delivery is... |
Holiday delivery is... |
Delivery day is... |
|
Holiday |
N |
N |
N |
Y or N |
Monday
|
|
Holiday |
N |
N |
Y |
Y or N |
Saturday
|
|
Holiday |
Y |
N |
N |
Y or N |
Monday
|
|
Holiday |
N |
Y |
Y or N |
Y or N |
Monday
|
|
Holiday |
Y |
Y |
Y or N |
Y or N |
Tuesday
|
|
Non-holiday |
Y or N |
Y or N |
N |
Y or N |
Monday
|
|
Non-holiday |
Y or N |
Y or N |
Y |
Y or N |
Saturday
|
Time in Transit File
Each carrier that supports the time in transit calculation has a set of the following screens for editing and importing files related to calculating time in transit:
-
Geographic Code
-
Transit Days
-
Holidays
-
Weekends
-
Importing Time in Transit Files
Caution: Although you can import files separately, the geocodes used in the Transit Days file must exist in the geocodes table. In addition, the services included in either
the Transit Days file or the Holidays file must be configured for the location and carrier in order for the import to be successful.
Notes:
-
After you create the time in transit files for a particular location and carrier, use the Import Time in Transit Files screen to import these files for a carrier, and then the other screens listed above to edit time in transit information as necessary.
-
If you enable time in transit calculation and the carrier has a system that provides time in transit data, for each shipment Parcel first attempts to retrieve the time in transit using the carrier's system. If for some reason this data cannot be retrieved, Parcel then calculates time in transit based on the data in the imported time in transit files. For carriers that do not provide time in transit data, Parcel calculates time in transit from the data in the imported time in transit files or from resident system data.
Geographic Code File Format and Screen
The Geographic Code screen for each supported carrier displays the Geographic Codes and associated data that Parcel uses for time in transit calculations. After you import the Geographic Code file, Parcel displays the table of these values on this screen, enabling you to add, edit, or delete rows as needed.
The Geographic Data file is a comma-delimited text file with the following format:Geographic Data File Headings
Variable type and length
Field Description
UI Field Name
geo_code
Alphanumeric, 32 characters
Destination Geographic Code; for example, METROLA for Metropolitan Los Angeles.
Geographic Code
geo_code_desc
Alphanumeric, 64 characters
Geographic Code description – For example: "Metropolitan Los Angeles".
Geographic Code Description
country_code
Alphanumeric, 3 characters
ISO country code – The two-character country code or ALL (for all countries).
Country
state
Alphanumeric, 20 characters
Destination state or province.
Note: For those countries where there is a state drop-down list in Parcel, this is the two-letter state/province code. For all others, it is the state or province spelled out.State
city
Alphanumeric, 50 characters
Destination city.
City
zip_low
Alphanumeric, 10 characters
Lowest postal code for the area included in the Geographic Code.
Zip Low
zip_high
Alphanumeric, 10 characters
Highest postal code for the area included in the Geographic Code.
Zip High
Import this file into the Parcel database using the Import Time in Transit Files screen.
Transit Days File Format and Screen
This screen displays the Transit days and related information that Parcel uses for time in transit calculations. After you import the Transit Days file, Parcel displays the table of these values on this screen, enabling you to add, edit, or delete rows as needed.
Caution: Before importing the Transit Days file, ensure that the following conditions are met: -
The Geo Code file must be either previously imported or imported when you import the Transit Days file.
-
You must already have configured the services included in the Transit Days file.
The Transit Days file is a comma-delimited text file with the following format:
|
Transit Days File Headings |
Variable type and length |
Field Description |
UI Field Name |
|
service_id |
Alphanumeric, 32 characters |
The Parcel Carrier Service ID code.
|
Carrier Service |
|
geo_code |
Alphanumeric, 32 characters |
Geographic Code as it appears in the Geographic Code file.
|
Geographic Code |
|
transit_days |
Integer (no length limit) |
Total number of days for delivery of shipment to the destination specified by the Geographic Code. The value of this field cannot be greater than 99.
|
Transit Days |
|
transit_time |
Time, hh:mm:ss |
Transit time in hours, minutes, and seconds.
|
Transit Times |
|
sat_delivery |
y or n flag |
Saturday delivery flag – y indicates Saturday delivery, n indicates no Saturday delivery.
|
Saturday Delivery |
|
include_weekend_transit |
y or n flag |
Flag determines whether to add the two weekend days Saturday and Sunday to the time in transit calculation if these days are not counted as transit days.
|
Add Weekend Transit |
Import this file into the Parcel database using the Import Time in Transit Files screen .
Holidays File Format and Screen
This screen displays the Holidays that Parcel uses for time in transit calculations. After you import the Carrier Holidays file, Parcel displays the table of these values on this screen, enabling you to add, edit, or delete rows as needed.
The Holidays file is a comma-delimited text file with the following format:
|
Holidays File Heading |
Variable type and length |
Field Description |
UI Field Name |
|
service_id |
Alphanumeric, 32 characters |
The Parcel Carrier Service ID code.
|
Service Name |
|
country_code |
Alphanumeric, 20 characters |
ISO country code – The two-character country code or ALL (for all countries). |
Country |
|
state |
Alphanumeric, 20 characters |
Destination state or province.
|
State |
|
holiday_desc |
Alphanumeric, 20 characters |
Name of holiday. |
Holiday Description |
|
holiday_date |
Alphanumeric, 8 characters |
Date of the holiday in the following form: YYYY-MM-DD. |
Holiday Date |
|
allow_delivery |
y or n flag. |
A y indicates that delivery allowed on the holiday; an n indicates delivery is not allowed.
|
Allow Delivery |
|
include_transit |
y or n flag. |
Flag determines whether to add one day for the holiday to the time in transit calculation if the holiday is not to be counted as a transit day.
|
Add Transit |
Import this file into the Parcel database using the Import Time in Transit Files screen.
Weekends File Format and Screen
This screen displays the Weekend details that Parcel uses for time in transit calculations. After you import the Carrier Weekends file, Parcel displays the table of these values on the Weekends screen, enabling you to add, edit, or delete rows as needed.
The Weekends file is a comma-delimited text file with the following format:
|
Weekends File Heading |
Variable type and length |
Field Description |
UI Field Name |
|
service_id |
Alphanumeric, 32 characters |
The Parcel Carrier Service ID code.
|
Service Name |
|
country_code |
Alphanumeric, 20 characters |
ISO country code – The two-character country code or ALL (for all countries). |
Country |
|
state |
Alphanumeric, 20 characters |
Destination state or province.
|
State/Province |
|
Weekend_desc |
Alphabetic, 3 characters |
Three-character day-name abbreviation; for example: SAT
|
Weekend |
|
allow_delivery |
y or n flag. |
A y indicates that delivery allowed on the weekend; an n indicates delivery is not allowed.
|
Allow Delivery |
|
include_transit |
y or n flag. |
Flag determines whether to add one day for the weekend to the time in transit calculation if the weekend is not to be counted as a transit day.
|
Allow Transit |
Import this file into the Parcel database using the
Import Time in Transit Files
screen.
On each of the previous screens, add a row to the table by clicking the ADD
icon in the upper left corner. Delete a row by clicking the DELETE
icon to the left of the row. Edit a row by clicking the EDIT
icon to the left of the row. Click SAVE to save your changes or CANCEL to exit the screen without saving changes.
Importing Time in Transit Files
Transit time calculations for some carriers require user-maintained transit time data. (See table in the following Help topic:
Overview of Time in Transit Calculation
.) You can import this data into the Parcel carrier database using the Import Time in Transit Files screen. This feature also includes the capability for the user optionally to import and maintain carrier Holidays and weekends at the destination level for the Time in Transit calculation to include when calculating an expected delivery date.
Import Time in Transit Files Screen
Use the Import Time in Transit Files screen to import the following data files for transit times and locations (origins and destination):
-
Geographical data (destination cities, postal codes, etc.) – Required for first import.
-
Time in transit data based on carrier service and destination – Always required for time in transit calculations to return a value.
-
Holidays file containing information about destination holidays – Optional.
-
Weekends file containing information on which weekend days to count for TinT – Optional.
When you import these files, Parcel inserts the data from these files into the carrier database. If you have Time in Transit enabled, when you perform a Rate or Ship, Parcel displays the transit time for the shipment.
Notes:
-
All files that you import must be located on a local drive of the DIServer. The absolute path that you specify according to the following table represents the file location on the DIServer.
-
The data in the time in transit files is customer-defined and does not come from the carrier.
To import Time in Transit files:
-
Create the Time in Transit files , and then copy these files to a directory local to the Parcel DIServer.
-
Use the Import Time in Transit screen in the Parcel Configuration (Web Admin) tool to specify the path names and filenames for these files according to the following table:
In this box...
Do this...
Geographic Data File
Type in or paste in the absolute local path name for this file on the Parcel DIServer, including the filename.
Note: This file is required the first time you import the set of Time in Transit files but is optional on subsequent file imports.Time in Transit File
Type in or paste in the absolute local path name for this file on the Parcel DIServer, including the filename.
Holidays File
Optionally, to include carrier holidays in Parcel's time in transit calculation, type in or paste in the absolute local path name for this file, including the filename.
Weekends File
Optionally, to include weekends in Parcel's time in transit calculation, type in or paste in the absolute local path name for this file, including the filename.
Note: This option currently applies only to FedEx Ground® and Home Delivery® services and UPS Ground® services.Format for Time in Transit Files
The time in transit files that you import (see previous section) must be comma-delimited CSV files of which the first row consists of the column (field) names listed in the following table. Subsequent rows contain comma-delimited data corresponding to the column names.
Caution: Since time in transit CSV files are comma-delimited, do not include commas in the data itself.
Notes:
-
You can copy and paste the following column name strings directly into the CSV file.
-
The values in the Geo Code fields can be arbitrarily defined, but since this column serves as the primary key, they must follow the same convention in all the files.
-
The Destination address data for a shipment must be identical to the corresponding data in the Geographic Data file (Address <n>, City, State).
The values for Transit Days and Transit Time are those estimated for the route defined by the Destination Geo Code.
|
File Type |
Web Admin Screen Name |
Required column names |
|
Geographic Data File |
Geographic Code |
Geo_code, Geo_code_desc, country_code, state, city, zip_low, zip_high |
|
Time in Transit File |
Transit Days |
Service_id, Geo_code, transit_days, transit_time (hh24:mm:dd), Sat_Delivery |
|
Holidays File |
Holidays |
serviceid, country, state, Holiday_desc, Date (YYYYMMDD), Allow_delivery, Include_transit |
|
Weekends File |
Weekends |
Service_id, country, state, Weekend_desc, Allow_delivery, Include_transit |
Note: For more information on TINT file formats, see the Help topic: Time in Transit Files .
Error logging
If a service is not configured or is invalid, Parcel logs this error to a separate file: ..\Kewill\Flagship\bin\Import_failures.log
How to Add, Edit, or Delete Table Entries
A number of configuration screens in the Parcel Web Admin tool are in table form. Each of these screens is essentially a view on the corresponding table in a Parcel or carrier database. For example, most of the Location Settings screens belong to this type, as shown in the following illustration for a segment of the Currency Codes screen:
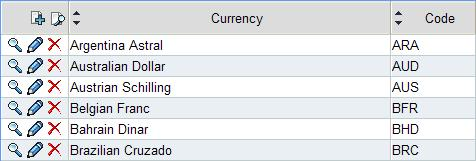
You can use this screen to carry out the following tasks:
-
Add a new row of data
-
Edit an existing row
-
Delete a row
-
Sort the table by column
-
Link to a specific set of rows if they occupy more than one page
-
Search the table for specific data
Caution: Some tables are for informational purposes only and should not be edited without the approval of Support. The Help topics for these tables indicate which ones can be edited and which ones should not be edited.
Add a Row to a Table
To add a table row:
-
Click ADD at the top of the screen to display the Add record dialog.
-
Fill in the fields on the dialog, and then click SAVE to save your changes or CANCEL to exit the dialog without saving changes.
Note: See the Help topic for the configuration screen for information on specific fields. If the table is populated by default, see the data in the table for examples.
Edit or Delete a Row
You can edit values in a table using either of the following methods (see the following procedure):
-
Edit the value in a single cell of a row.
-
Edit the row using the Edit record screen.
Notes:
-
The values in some columns on some table screens are not editable.
-
Some tables cannot be edited by individual cells using the in-line method.
To edit a table row:
-
Carry out one of the following steps:
-
Click the EDIT icon at the top of the screen to display the edit dialog, make the desired modifications in the fields on the dialog, and then click SAVE to save your changes or CANCEL to exit the dialog without saving changes
-
To edit a single value, click on the cell with the value, modify the value, and then click the disk icon to save the change or click the undo arrow icon to undo and cancel the change.
-
-
Change the values in the fields that you want to edit, and then click the SAVE to save your changes or CANCEL to revert to the previous values.
To delete a row from a table:
-
Select the row, and then click the DELETE icon.
Note: You can select more than one row by holding down the left mouse button and dragging the mouse.
-
A confirmation dialog opens. Click OK to delete the table or click Cancel to retain the row.
Search a table
To search a table:
-
Click SEARCH icon at the top of the screen to display the Search dialog.
-
From the drop-down list, select the column you want to search.
-
In the search field, type your search criterion, and then click the SEARCH icon to display the results on the table screen.
Note: See the Conventions Help topic for additional descriptions of these editing icons.