BluJay Solutions Parcel 21.1.0 - User Guide
How to Add, Edit, or Delete Table Entries |
Scroll |
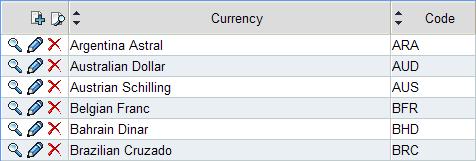
A number of configuration screens in the Parcel Web Admin tool are in table form. Each of these screens is essentially a view on the corresponding table in a Parcel or carrier database. For example, most of the Location Settings screens belong to this type, as shown in the following illustration for a segment of the Currency Codes screen:
You can use this screen to carry out the following tasks:
•Add a new row of data 
•Edit an existing row ![]()
•Delete a row ![]()
•Sort the table by column 
•Link to a specific set of rows if they occupy more than one page 
•Search the table for specific data 
Caution: Some tables are for informational purposes only and should not be edited without the approval of BluJay Solutions Support. The Help topics for these tables indicate which ones can be edited and which ones should not be edited.
Add a Row to a Table
To add a table row:
1.Click ADD  at the top of the screen to display the Add record dialog.
2.Fill in the fields on the dialog, and then click [SAVE] to save your changes or [CANCEL] to exit the dialog without saving changes.
Note: See the Help topic for the configuration screen for information on specific fields. If the table is populated by default, see the data in the table for examples.
Edit or Delete a Row
You can edit values in a table using either of the following methods (see the following procedure):
•Edit the value in a single cell of a row.
•Edit the row using the Edit record screen.
Notes:
•The values in some columns on some table screens are not editable.
•Some tables cannot be edited by individual cells using the in-line method.
To edit a table row:
1.Carry out one of the following steps:
•Click the the EDIT ![]() at the top of the screen to display the edit dialog, make the desired modifications in the fields on the dialog, and then click [SAVE] to save your changes or [CANCEL] to exit the dialog without saving changes.
at the top of the screen to display the edit dialog, make the desired modifications in the fields on the dialog, and then click [SAVE] to save your changes or [CANCEL] to exit the dialog without saving changes.
•To edit a single value, click on the cell with the value, modify the value, and then click the disk  to save the change or click the undo arrow
  to undo and cancel the change.
2.Change the values in the fields that you want to edit, and then click the [SAVE] to save your changes or [CANCEL] to revert to the previous values.
To delete a row from a table:
1.Select the row, and then click the DELETE ![]() .
.
Note: You can select more than one row by holding down the left mouse button and dragging the mouse.
2.A confirmation dialog opens. Click [OK] to delete the table or click [Cancel] to retain the row.
Search a table
To search a table:
1.Click SEARCH  at the top of the screen to display the Search dialog.
2.From the drop-down list, select the column you want to search.
3.In the search field, type your search criterion, and then click the SEARCH  to display the results on the table screen.
Note: See the Conventions Help topic for additional descriptions of these editing icons.