BluJay Solutions Parcel 21.1.0 - User Guide
UCM Carrier Administration - Shipper Defaults and Sequence Data |
Scroll |
Shipper Defaults Screen and Tabs
UI Administrative elements that you create in UCM can appear as tabs on the Shipper Defaults screen. You can also create additional administrative screens. After you set up in your UCM carrier definition and add the carrier to a Parcel location, you can manage the administrative elements at the carrier instance level in Parcel by changing default values using the Parcel Web Admin tool. Defaults that you set in Parcel override those set in UCM. For example, if EOD consolidation is enabled by default in the carrier definition, it can be disabled by default in Web Admin. In general, settings and data for a specific carrier instance in Parcel override those in the UCM carrier definition.
By default, the UCM Shipper Defaults screen includes a Time in Transit tab with the following fields:
•Calculate Transit Time – To specify calculation of transit times, select (check) this check box. Parcel uses the data that you import using the Import Time in Transit Files screen for transit time calculations.
•Standard Saturday Delivery – Selecting this check box includes Saturday as a delivery day in time in transit calculations.
By default, the UCM Shipper Defaults screen also includes a Defaults tab with the following field: Units of Measure.
Sequence Data and Sequence Numbers
Sequence numbers created for a UCM carrier definition translate into a Sequence Data link and screen when in the Parcel carrier instance. The Sequence Data screen includes a tab for each sequence number created in UCM, as shown in the following example:
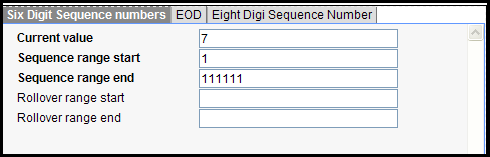
Sequence numbers are used with both tracking numbers and EOD manifests. After you add the carrier to Parcel, you can use this screen to configure the sequence numbers.
Note: There is a corresponding tab on the Parcel UCM carrier Sequence Data screen for each sequence number created for the carrier definition in UCM. The only default values set in UCM are the sequence number length and the amount by which a sequence number is increment. Use the tabs on this screen to set the actual values for the sequence numbers and ranges.
To configure sequence numbers...
1.In Parcel, under the UCM carrier, select the Sequence Data link.
2.Configure the data for each sequence number as described in the following table:
In this box... |
Enter the following information.... |
Current value |
Next value to be assigned from this sequence number. |
Sequence range start |
Beginning of the range of numbers this sequence number will generate. |
Sequence range end |
End of the range of numbers this sequence number will generate. |
Rollover range start |
Beginning of the rollover range. |
Rollover range end |
End of the rollover range. |
3.Click [SAVE] or click [CANCEL] to cancel the operation.